
Latest Version: 0
The In Scene Events Controller is several event-related tools all mashed into one. It can perform a variety of gameplay-related functions, and is one of the most useful tools for programming game logic in Besti X.
In general, it is used to create events or to act as an interested party to events that originate from other Besti SDK tools.
How to use
- Create an empty game object in the Hierarchy view.
- Give the game object a unique name. You will need to reference it later, so label it clearly so you can find it.
- Drag and drop the In Scene Events Controller onto the empty game object.
- Configure as desired. How you do this will vary greatly depending on what you are trying to accomplish.
For additional information, this tool is used in the Unity Event tutorial.
Section Information
System Events
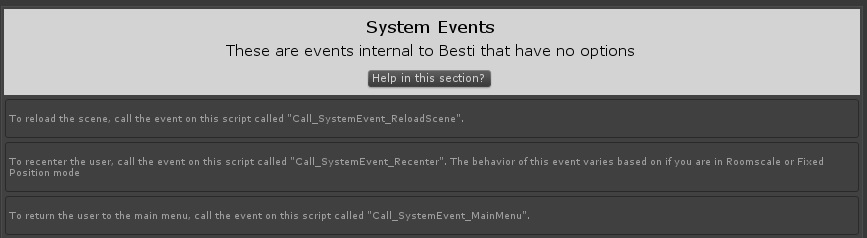
The system events section contains instructions on events that are internal and specific to Besti.
The system events section has no options by itself. These functions are useful to other event generators, and act as interested parties to perform functions when events are generated. Check out the Event Tutorial for how to do this. It describes the following functions:
Call_SystemEvent_ReloadScene. Call this from an event creator if you would like to reload the scene. When called, the screen will fade to black, and the user will load into the same scene that is currently running.
Call_SystemEvent_Recenter. Call this from an event creator to change the user’s position a bit. The behavior varies depending on if this is a roomscale scene, or a fixed position scene.
- In Fixed Position scenes, it will move the player such that his or her head is precisely at the point where you specified it should be as the entry position of the scene.
- In RoomScale scenes, it will move the player’s feet back to the starting position of the scene.
Call_SystemEvent_MainMenu. Call this from an event creator to send the user back to the main menu. When called, the screen will fade to black, and move the player back to the main menu of the game.
Custom Events

The Custom Events section contains 4 parts:
- The Empty Events section
- The Scene Load Events section.
- The Teleport Events section
- The Duplication Events section
All of these sections work in the same way, but perform different actions depending on what you’re trying to do. To use any of the events in this section, set up an event creator to use the function listed next to the dropdown, along with the number of the event you are calling. For example, having an event run “Call_CustomEvent_Empty” with a value of “2” will run whatever is in the 3rd position of the dropdown (computers always start counting at 0.)
See the Event Tutorial for a specific and more detailed example of the Scene Loading function in this section.
The Empty Events section allows you to create arbitrary Unity Events that can be associated with anything and perform any task that requires, at most, a single variable. Add as many events as you need by increasing the size variable. Run these events by having an event generator call “Call_CustomEvent_Empty” and send a number to indicate which one on the list should be run.
The Scene Load Events section allows you to load different SDK scenes by giving the name of the scene and the creator name of the scene. The name of the scene is the first entry in the “Name of Module In Menus” section of the Master Asset. The creator of the scene is what you write in the “My Name” section of the Master Asset. Run these events by having an event generator call “Call_CustomEvent_SceneLoad” and send a number to indicate which one on the list should be run.
The Teleport Events section moves the player to a specified location using the teleport system. Each entry requires a transform, which is easiest to create by simply making an empty game object in the Hierarchy view and positioning that as desired.
This behavior differs a bit depending on if this is a Roomscale scene or a Fixed Position scene.
- In Roomscale scenes, this is where the player’s feet will go. If you teleport the user into the air, he or she will fall until he or she comes in contact with the ground. Try to put this at ground level where you are trying to move the user, because suddenly falling from the sky can be disorienting. The Z direction of the provided transform (the direction of the blue arrow) is the direction that the user will be facing after the teleport.
- In Fixed Position scenes, this is where the user’s head will be positioned after teleport. The Z direction (the direction of the blue arrow) is the direction that the user will be facing after the teleport.
Run these events by having an event generator call “Call_CustomEvent_TeleportToTransform” and send a number to indicate which transform on the list should be the destination position.
The Duplication Events section allows you to duplicate an object in your scene and position it at the transform that you provide. You must create a special kind of object using the Duplicated Object Behaviors tool to use this, so check out those instructions on how to set this up.
Each entry requires an object to duplicate and a transform to duplicate the object at. Run these events by having an event generator call “Call_CustomEvent_DuplicateAnObject” and send a number to indicate which object+transform pair to use.
Special Button Events

The special button events section allows you to create events that happen when the user pushes one of the 4 “Special” buttons assigned in his or her button configuration. These are not assigned by default, so it may be prudent to add these to buttons that you feel are appropriate using the Override Controller Bindings tool.
These events run themselves automatically when the respective “Special” button is used. Special buttons can be assigned to the keyboard, mouse, VR controller, game controller, or even hand gestures on Oculus Quest.