
Latest Version: 0 (Beta 5 release)
The Besti SDK Master Asset tool is the most critical part of configuring your Besti Module for publishing. It tells Besti how to process your module, how to set up a menu entry for it, and it tells us how to categorize your asset in the Besti Store. It also handles the compile process that turns your creation –whatever that may be– into an experience that works with Besti.
Video Overview
There are many ways to use the BestiSDK Master Asset. Your use of this depends on what you’re trying to accomplish. Videos are available for different tasks.
Using the master asset to make a scene.
How to use (in general)
- Create a new empty game object in the root of your scene.
- Reset the game object’s position and rotation to 0, 0, 0, and set the scale to 1, 1, 1.
- Rename the asset to “MasterAsset”
- Add the “BestiSDK_MasterAsset_x” tool to the “MasterAsset” game object.
- Everything you create should be a child of the “MasterAsset” game object.
Section Information
Publishing Tools

The publishing tools section contains 3 main parts:
- The Compile button
- The Run Besti button
- The Error/Progress log
The Compile button starts the process of converting your creation into a Besti Module. This is the final step done in creating your Besti Module, and should only be pressed once you’re satisfied with your creation (or you want to test something you’ve created.) This process can take several minutes to complete, and if it succeeds, it will save your Besti module into the directory you specified in the Basic Information section‘s “Path To Add On Folder” field. If there is nothing in this section (or it is pointed to the wrong place) this will produce an error. In addition to saving your file, if the process succeeds, a text file will pop up that shows the complete log of the compile process. This DOES NOT automatically upload this to the store for publication on the web, but the content it produces is compatible with the Windows version of Besti X. If/When you want to submit your content to the Besti Store for distribution, the files that are created in this process are what you will need to upload. If the compile function can not be used, the button will be red.
The Run Besti button simply starts the version of Besti that you specify in the Basic Information Section‘s “Path to Besti EXE” field. This will produce an error if that section is not filled out. It is just a shortcut, but you may find it easier to push this button than to start Besti through the launcher. If the button can not be used, the button will be red.
The Error/Progress log will show you information about the compile process if one is currently running. This does not work on “Scene” types of compile processes because of how Unity handles compressing scenes. It works on other assets, though, and gives you a live update of the compile process. The “Clear Log” button will reset the log if you want to do that. If you press the Compile button or the Run Besti button when it is red, the error log will tell you more specifically why you can not compile or run Besti. Note that the log will still show information AFTER you fix any issues that are shown here, so press the clear log button to erase its contents if you would like that log to be empty. Pressing the Compile button will also clear the log before starting the compile process.
Basic Information
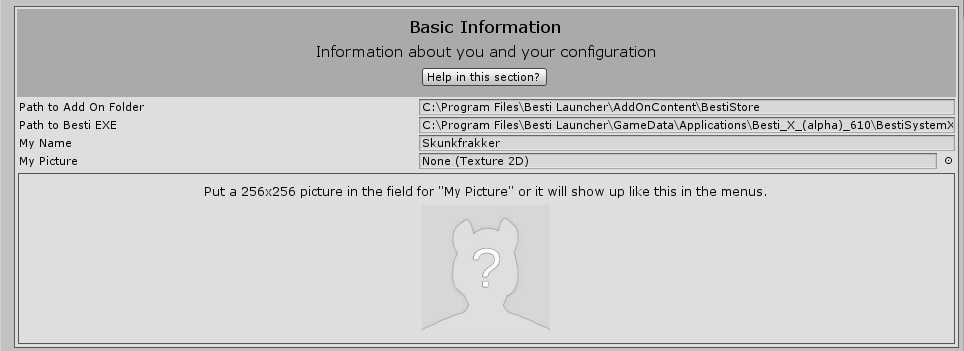
The basic information section consists of 5 main parts:
- The Path To Add On Folder field
- The Path to Besti EXE field
- The My Name field
- The My Picture field
- The preview/editing area.
The Path To Add On Folder field is the folder location of the Besti Launcher’s “Besti Store” directory. This can be inside of a sub directory (like \BestiStore\MyCoolModule) and Besti will still find it. The location specified here is where files will be placed when you push the “Compile” button in the Publishing Tools section. The easiest way to fill this out is to open a file explorer window to where you want to put your files, click the bar on the top that shows you where you are in the directory structure, and then copying the long directory by right-clicking it and choosing copy. You can then paste that into the field. Do not put a slash at the end.
The Path to Besti EXE field tells the Besti SDK where to find your copy of Besti X. This is used in the Publishing Tools section when you press the “Start Besti” button. The idea of this is that you will want to test assets after creating them, so a quick shortcut to Besti will help you do that as opposed to starting the Besti launcher and then starting Besti from there. The easiest way to get this is to open the Besti Launcher, click the copy of Besti you want to create a shortcut to, click the wrench button, then click the browse button. This will open a file window and highlight the Besti exe file. Right-click that file, and choose “Properties.” The text next to “Location” in the “General” tab is the line of text you want to copy and paste into this field.
The My Name field is where you, the creator of this content, want to write your name. Consider this your branding, so choose a cool name that is easy to spell so you don’t end up with people calling you something silly like “Skunkfrakker” for years.
The My Picture field is where you can place a picture that represents your branding (character, avatar, a real picture, your logo, etc…) This is shown next to your name in the menus and in the Besti store as the creator of this asset. To populate this field, you need to import a 256 x 256 pixel image file.
The preview/editing area is where a larger version of the picture in the “My Picture” field will be displayed. If the picture you selected in the “My Picture” field is not configured properly, an error message and a “fix picture” button will appear here instead of a preview. Pressing that button will fix the picture’s scale and import options to work properly inside of Besti. Besti handles most import option settings for you automatically, but the one it doesn’t do automatically is fix the size of pictures. The reason it doesn’t do this automatically is to give you the opportunity to fix the picture in an image editor, rather than having the automatic scale adjustment do it which could lead to aspect ratio problems, or a picture that is unacceptably blurry. It does a good job, but it doesn’t do as good of a job as Photoshop or GIMP, for example.
Asset Information
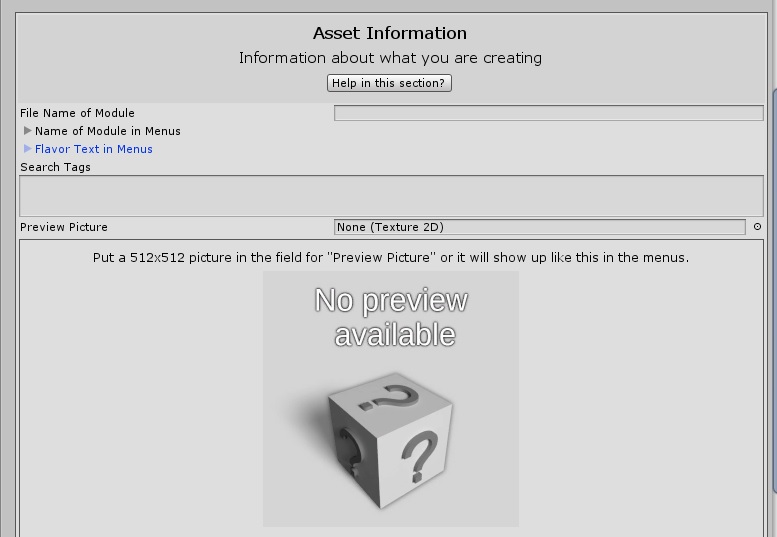
The asset information section consists of 5 main parts:
- The File Name of Module field
- The Name of Module in Menus nested list
- The Flavor Text in Menus nested list
- The Search Tags field
- The Preview Picture field
- The preview/editing area
The File Name of Module field is the name shared by the files you create with the Besti SDK. The compile process will use what you type in here to name the files it creates for you for use in Besti. For example, if you typed the word “happy” in this field for a scene you created, the files happy.ibmi and happy.ibms (the Besti Module Components) happy.txt (A log created during the compile for you to read) and happy.manifest (a list of what is in the .ibms file used by us to create the module for distribution in the Besti Store.) If you were to distribute your creation to a friend or online, you would distribute happy.ibmi and happy.ibms to him/her. This field is not case sensitive, and will convert whatever you type into lower case letters when you compile. If you do distribute this file on the Besti store, this name will have numbers appended to it (an asset named “happy” would be distributed as “107400-happy”, for example.) The reason why you can specify a file name is for your benefit, and the ability to iterate on your creations without overwriting. Say you were creating a module called “happy”, and wanted to add version numbers to it so you could more easily keep track of changes you have made. You could choose to name the first version “happy1”, the second “happy2” and so on, without needing to change other fields to keep additional copies of your content.
The Name of Module in Menus field is where you define what the name of your creation is. This is a more complicated field than most in the Besti SDK as it has two steps whereas most behaviors just have one.
The first step is to put in a number to tell the SDK how many fields you need. If you just want your module to have one name in all languages, you can put a 1 in this field. If you want your module to have a different name in different languages, put a larger number in here. At present the languages English and Russian are supported, but more languages will be added in the future. If you would like a different name in every language, right now you would put a 2 here (one name for English, one name for Russian.) You can press enter once you’ve set a number.
The second step is to specify the name and the language that name is for. If you are specifying the same name in all languages, you would type in the name in the “text” field, and then use the dropdown to select any language. If only one language is specified, Besti will use the same name for all languages. If you want to specify a different name in different languages, type the name you want and then choose a different language for each entry.
Here are some hypothetical examples:
- You want your module to be called “Happy” in all languages. Put a 1 in the field for the “Size”, press enter, type in “Happy” in the “Text” field, and choose English from the drop-down.
- You want your module to be called “Happy in all languages. Put a 1 in the field for the “Size”, press enter, type in “Happy” in the “Text” field, and choose Russian from the drop down. You can see this has an identical result to choosing English like the above example.
- You want your module to be called “Happy” in English, and “Счастливый” in Russian, depending on whether or not the player has his/her language set to English or Russian. Put a 2 in the field for “Size”, press enter, type in “Happy” in the “Text” field, and choose English from the drop down. Below that, put “Счастливый” in the “Text” field, and choose Russian from the drop down.
As additional languages are added, the default behavior will be to use the English name if that language was not available at the time you made your module. If you only give the module a Russian name, that’s OK, too: Besti internally saves the English name as the Russian name if an English name is not specified by you.
The Flavor Text in Menus field works in an identical way to the name of module in menus field, except this section defines the flavor text of what you have created. This field is optional, but it shows up on the menu system when users are making a selection of what objects to load, or what scenes to load. The idea is that you provide a basic description of your asset (up to around 50 words) so the user does not need to rely upon exclusively the picture or name of the asset. If you can’t think of anything to put in here, that’s OK, too, but it does increase the polish and appearance of your asset. The Besti Store also uses what you put in here to try to encourage other users to download your creation, so you may also consider this area something of a marketing tool.
The Search Tags field is a place to help other people find what you made. This function is specifically for the Besti Store, so it is optional. The search on the Besti store uses these tags to return results, so if you want your module to turn up for other words, type those words in here. For instance, customers looking for a science fiction experience might look for the word “space” so putting “space” in that field would be a good idea if you have a science fiction theme to your creation. The proper way to type things in here is to type your tag followed by a comma. Do not use spaces anywhere. Instead use separate tags. For example, if you made a Pizza Cats themed environment, you might want to tag that with “anime,pizza,cats,pizzacats”
The Preview Picture field works almost exactly like the “My Picture” field in the Basic Information section. The difference is that you use a 512 x 512 picture in this one. Import your artwork into Unity, and then drag and drop your picture file here. In the menus and the Besti Store, this is shown as the preview of what your module is.
The preview/editing area works just like the preview/editing area in the Basic Information section. This is where a larger version of the picture in the “Preview Picture” field will be displayed. If the picture you selected in the “Preview Picture” field is not configured properly, an error message and a “fix picture” button will appear here instead of a preview. Pressing that button will fix the picture’s scale and import options to work properly inside of Besti. Besti handles most import option settings for you automatically, but the one it doesn’t do automatically is fix the size of pictures. The reason it doesn’t do this automatically is to give you the opportunity to fix the picture in an image editor, rather than having the automatic scale adjustment do it which could lead to aspect ratio problems, or a picture that is unacceptably blurry. It does a good job, but it doesn’t do as good of a job as Photoshop or GIMP, for example.
Base Configuration

This section consists of one part:
- The Base Configuration dropdown
The Base Configuration dropdown tells the Besti SDK how to compile your Besti Module, and gives you additional options that vary depending on what you’re trying to make. As this is the first version of the Besti SDK, the only function available right now is to create a “Scene” but other options are available. The currently planned module types are:
- Scene: A world for you to explore, or a defined experience. This is for more advanced creators that want to create a setting or a complete experience for users. Creations here show up in the “Places” menu in Besti X.
- AI Friend Base Model: A 3D character that can have the Besti friend AI applied to it. A fun way to create your own (or have someone create) your perfect fantasy character.
- AI Friend Voice Pack: A collection of sound files that can be lip-sync matched to allow AI Friend Bases to speak in your desired language.
- AI Friend Skin: A texture file to change the look of an AI Friend Base.
- AI Friend Accessory: A clothing or otherwise attached model to be worn/be part of an AI Friend Base. This can be used, for example, to make clothes, horns, hairstyles, or any other thing that attaches to the friend in some way.
- Avatar Base Model: A 3D character that can become the body of the user. This is a way to create your own look within Besti.
- Avatar Base Skin: A texture file to change the look of an Avatar Base.
- Avatar Accessory: A clothing or otherwise attached model to be worn/be part of an Avatar Base. This can be used, for example, to make clothes, horns, hairstyles, or any other thing that attaches to you in some way.
- Object: A 3D object that can be interacted with in some way. This can be functional (like a firearm) or a prop (a statue for use in a scene, for example.) Creations here show up in the “Things” menu in Besti X.
Material Configuration (Still in Development in Beta 2)

The Material Configuration section is not functional yet. It will be a place to assign optimized shaders when creating Scenes or Objects, and simplify that process for you. You may ignore this section in Beta 4.
Scene Configuration

This menu appears if you select “Scene” with the Base Configuration dropdown in the Base Configuration Section
This menu adapts the available options depending on what you have selected.
The Pre-Check Scene button performs a quick analysis of the objects in your scene to ensure compatibility. It can fix most things automatically, but there are some things it brings to your attention, instead. The report generated by this is shown in the Progress/Error log in the Publishing Tools section. It will start messages with “AUTO FIXED” if it automatically repairs a detected problem, or “FATAL ERROR” if it detects a problem that it will not automatically fix for you. All messages are then followed by a description of what was changed, or what should be changed by you. Further features are planned for this function to also advise you of best practices and potential oversights (like having a roomscale scene but no teleport-OK surfaces available) but it currently only detects things that are known to cause issues.
The Type of Experience dropdown is used to determine how this scene functions. There are two options that offer completely different experiences: Roomscale and Fixed Position.
- A Roomscale scene places the user’s feet at the position specified in the “Entry Position” field. The user can then wander around the scene and interact with movable objects. Use this option for more open-ended experiences where the user should be free to move about.
- A Fixed Position scene places the user’s head at the position specified in the “Entry Position field. In fixed position scenes, the user can only choose to “reset” his or her position back to the Entry Position location, and can not move around freely otherwise. Use this option for specific experiences that are directed by you, typically with an animation of some sort. This setting is designed to offer creators with 3D animation experience the option to create a scene in Besti rather than exporting their creation as a video. You can not bring in custom friends or avatars into fixed position scenes.
The Entry Position field is where the user’s feet or head will be when he or she enters the scene. This is a drag and drop field for an empty game object in your scene. Position the object where you want it to be within your scene, and make sure that the game object is a child of the MasterAsset game object. Whether this is the user’s feet or head is determined by the Type of Experience dropdown. Roomscale experiences use this position to place the user’s feet, and Fixed position objects use this to position the user’s head. The direction the user will be facing is towards the Z (blue) axis of the game object.
Allow Custom Avatars is an on/off switch that permits the user to change his/her body in the scene. This option is ONLY available in Roomscale scenes. If the option is on, the user will be able to assign an avatar for use in the scene. If it is off, the user will not be able to bring in an avatar. You may wish to turn this off if you want to create a custom avatar for your scene, and force the user to use that instead of another option.
Allow Custom Friends is an on/off switch that permits the user to bring in AI friends. This option is ONLY available in Roomscale scenes. If the option is on, the user will be able to spawn in friends to interact with. If it is off, the user will not be able to do that. You may wish to turn this off if your scene has a unique friend to interact with that is part of the scene you are creating, and you would prefer to not have other characters in the scene brought in by the user.
The Type of Sky dropdown determines what generates the sky, and how the lighting in the scene works. There are two options: Skybox, and Procedural. It is probably easier to think of Skybox as “manual” and Procedural as “automatic” as the procedural option handles most things for you, whereas Skybox requires you to make several artistic decisions. It is best to leave this on Procedural unless you have significant experience in developing for Unity and/or Besti.
The Type of Weather dropdown tells the procedural sky system what type of weather your scene should have. This option is only available if the type of sky is set to Procedural. There are several types of weather options available, from clear sky to an overcast sky with rain. Choose the one that best fits your scene.
The Time Options dropdown sets how time is handled in the scene. There are 3 options, and these produce sub-options that you can specify to fine-tune the experience.
- Fixed Time locks the time at a time you specify. This adds the additional option Hour of Day To Start, which lets you specify in 24 hour time format the time of day you wish it to be. In 24 hour time format, 5PM would be 17, for example.
- Simulate Time Progression simulates the passage of time with day and night lengths that you specify. This adds the additional options Minutes in a day, which governs how long a “day” cycle lasts, and the Minutes in a night option, which does the same thing for the length of the night. Set both of these to a number larger than 0, because 0 would make no sense (the day is over once it begins, the night is over once it begins, repeat. This causes really weird behavior where the sun and moon are in a continuous rapid loop.) A good value to start with is what Minecraft uses, which is 10 minutes for the day and 7 minutes for the night. This is a fairly common simulated day/night cycle that your users will find comfortable.
- Match User Time sets the in-simulation time to the same time as the user’s computer (most of the time, this is the local time the user is in.) The accuracy of the simulation is set to the tropic of cancer on Earth, so while it won’t exactly match your user’s sun position unless he or she shares that latitude, it is usually pretty close unless your user lives in the extreme north or south.
The Hour Of Day To Start dropdown is shown when the Time Option dropdown is set to Fixed Time, or Simulate Time Progression mode. This allows you to set the time of day that it will be when the user first enters your scene. If you are in Fixed Time mode, this box will also adjust the time simulator to make the lighting match this time of day.
The Hour for Time Simulation dropdown is shown when the Time Option dropdown is set to Simulate Time Progression, or Match User Time mode. By adjusting this dropdown, you change the behavior of the time simulator so you can test various times per day to make sure that your lighting is still working appropriately.
If you choose to manually configure your lighting instead of using the procedural system, the Scene Configuration menus look very different.
The Skybox Material field allows you to assign a Unity skybox material. This option is ONLY available if the type of sky is set to Skybox. You must create the material, and then drag/drop it into this field.
The Lighting Concept To Use dropdown allows you to choose whether to use Realtime lights, or baked lights. This option is ONLY available if the type of sky is set to Skybox. Internally, this tells Besti to use the Realtime Global Illumination system, or the Baked lighting system. It can take a very long time to create a baked light map, so when you compile your scene the editor will appear to hang for 20 minutes to an hour. This is expected as there are a lot of calculations to perform.
The Source of Ambient Light dropdown allows you to choose how objects are lit when they are not being lit by a direct light source. This option is ONLY available if the type of sky is set to Skybox. This can be from your skybox, or from a solid color. This is a somewhat complicated concept. If you are using the Realtime GI system, light probes, and a reflection probe, you should choose Skybox for more physically accurate lighting.
The Ambient Light Color field is where you specify the color to use for ambient lighting if you choose to use a color instead of the skybox. This option is ONLY available if the type of sky is set to Skybox, and the source of ambient light is set to Solid Color. To set a color, click the field to bring up the color picker, and choose one. A gray color is ideal for most situations, but you can create very artistically unusual scenes by manipulating this color. This is a somewhat complicated concept.