
The Besti SDK uses a concept called an event system to drive its gameplay. While there are thousands of internal events that control how the system works internally, these are mostly transparent to you as a designer using the Besti SDK. What you can focus on are creating events that drive YOUR gameplay, and make your project unique.
But what is an event, and how does it work? This guide covers that.
The Basics of Video Games
Let’s start by thinking about how a video game works at a conceptual level. There are scripts (little packages of game code) that perform tasks or mathematics. When programming a game, the coder has a choice on how often scripts should do their thing.
There are a bunch of ways to do this, but in general, scripts are run on what is called an update cycle, or on an event.
What the hell is an update cycle?
Scripts that run on an update cycle are typically run on every frame. You often hear about how many “FPS”, “Frames Per Second”, or “Ticks” a game runs at, and this is usually the update cycle of the game. When running a game, the governing factor of this is usually your monitor’s refresh rate. This is why so many games are “60 Frames Per Second” because that’s a pretty typical maximum refresh rate for a monitor. Games use a concept called “V-Sync” which check the monitor’s refresh rate, and set their update cycle accordingly. There’s no point in doing update cycles if they can’t be seen, and sometimes, an update cycle will happen while the monitor is refreshing itself which leads to a graphical glitch called “Screen Tearing” or a different picture on the bottom of the screen than the top because the results of what should be on screen have changed while the monitor was drawing a new picture.
“Ticks” as a term usually refers to online servers that are not refreshing a screen, but instead have a limiting factor of how much bandwidth they can use in a practical way. You will frequently hear people complain “Call of Duty Warzone is only 15 ticks per second! Hot Garbage!” or something similar. That’s actually normal, because otherwise it would use too much bandwidth for people to play it, and people with more bandwidth availability would have a competitive advantage so great that bandwidth would be the primary determining factor of success.
But why is frame rate/tick rate important? Your update cycle determines your game’s performance, and as few things things as possible should be recalculated on every cycle. Consider a moving object. Every frame, that object is going to be in a different position. It therefore requires some kind of math to determine, on every single frame, where that moving object should be. The faster the update cycle, or the higher the frame rate, the more frequently that calculation needs to be made. You must recalculate this on every frame, because it is different on every frame.
What what about things that don’t move on every frame? What about calculations and behaviors that only happen when a button is pressed, or when a player is in a specific location? While you could put something like that in the update cycle, it is incredibly inefficient to do so.
Take the game Doom, for example. At the end of the stage is a button that exits the level, and moves onto the next. If this were on an update cycle, that door would work like this:
Is the exit button pressed?
No.
Is the exit button pressed now?
No.
How about now?
Still no.
It would need to do that 60 times per second for the whole game, which is very wasteful of computer resources. If every button and door worked that way, the game would run so slowly it would be unplayable.
The ideal situation then would be to have the button itself notify a script when the button was pressed, so the rest of the time the game could just ignore the button and focus its attention on gameplay, instead.
Thankfully, you can do exactly that with an event.
What the hell is an event?
Events are a main source of efficiency in a video game, and are therefore used everywhere possible. Every time you replace something on an update cycle with something driven by an event, you get a performance increase in your program (assuming whatever is creating the event isn’t doing so on every frame, of course.)
Conceptually, events are harder to program and visualize than things on an update cycle, but not by much. A simple event has the following two pieces: The event creator, and one or more interested parties.
The event creator is the thing that kicks off the action. It is the end level button in Doom, or the thing that looks for a player to be standing in a specific place, like a hitbox on a coin in Mario.
The interested parties are the scripts that perform the response or reaction to an event being created. It is the code that loads the next level in doom in response to the button, or the code that collects the coin in Mario when Mario touches it.
Another way to conceptualize an event is an If/Then statement. If X is true, Y should happen. If Mario is on the coin, the game should destroy the coin, play a jingle sound, and add a coin to the player’s coin count. One possible arrangement of roles in this relationship are as follows:
- The coin’s hitbox (collider) is the event creator that sends an event when Mario is touching it.
- The code that makes the jingle sound is an interested party.
- The code that adds +1 to your coin count is an interested party.
- The code that destroys the coin is an interested party.
Combining scripts that run on an update cycle and on events creates gameplay itself.
How to create gameplay with events in the Besti SDK
Creating events is super easy in the Besti SDK! There are many tools which create events, and many that respond to them. In addition to that, most built-in aspects of Unity also respond to events, and you can use these in your Besti SDK creations, too.
Let’s take an easy-to-use tool that creates events and break it down and look at how it works. For this example we will use the Player Detector tool, which is a tool that creates an event when a player’s head or hands are detected.
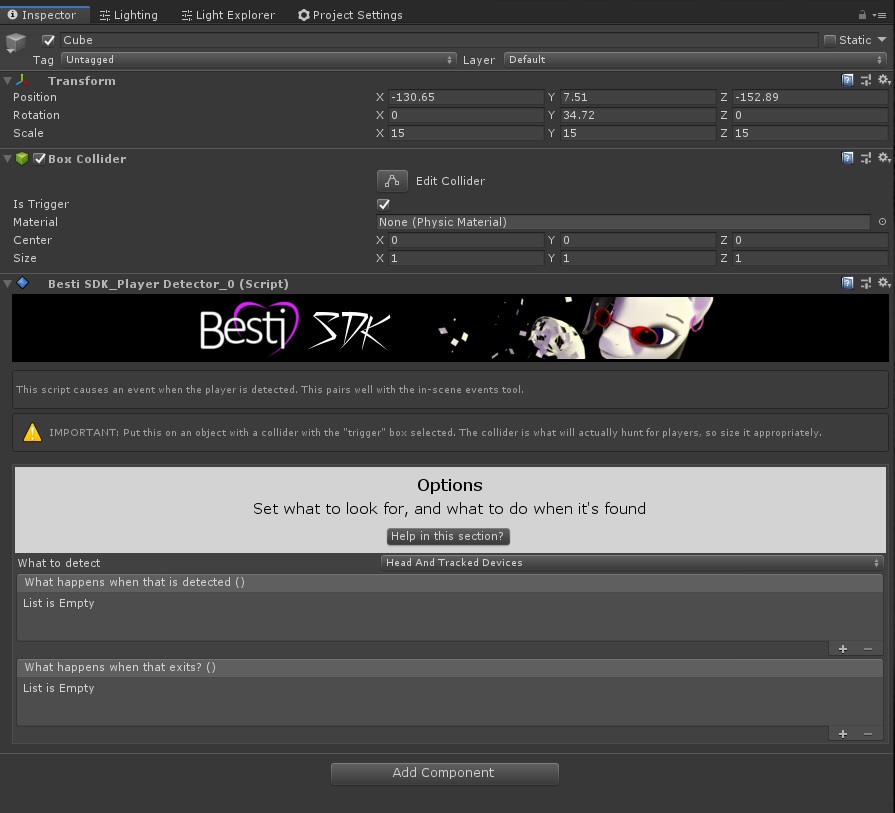
When you create a player detector, it will look like this:
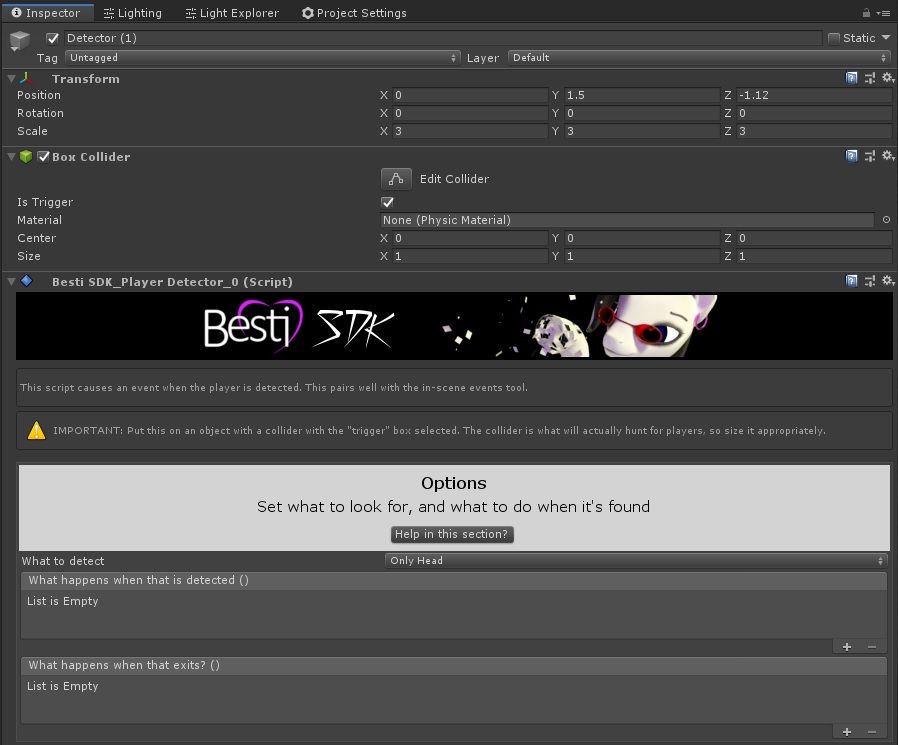
We can see there are a few scripts on this. Let’s examine what these are.
At the top is the Transform script, which determines the object’s position, rotation, and scale.
Below that is the box collider, which is an Nvidia PhysX thing which tells the system when other objects touch it, run into it, etc… Because Nvidia PhysX is very complicated and powerful, you usually need other tools to do much with them. In this case, our tool will manage two events this creates called “OnTriggerEnter” and “OnTriggerExit”
Last is the Besti SDK Player Detector script, which has a dropdown to determine what it should be detecting. In this case it is set to “Only Head” which tells the script to only create events when the player’s head is detected entering or leaving the collider. It also has two event creators; one for when the player’s head (in this case, because of the dropdown setting) enters the collider, and one for when it leaves.
For the setup as pictured above, the Event Creators are the boxes titled “What happens when that is detected” and “What happens when that exits?” Inside of each box where it currently says “List is Empty” is where we will put our Interested Parties–things that react to the event that is created.
Specific use case example
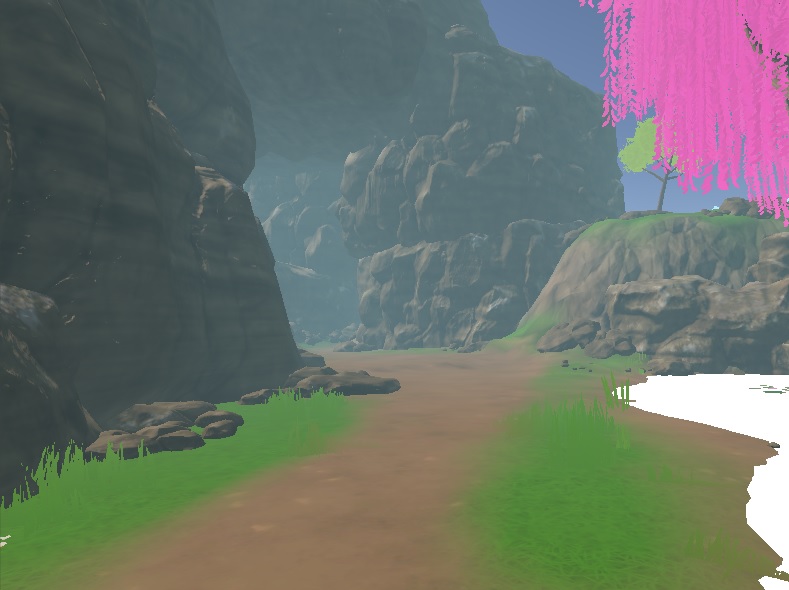
For the sake of the example, let’s set this up to load another scene when it detects the player. Let’s say you have a scene that is a beautiful forest, but to have more complicated environments we have split the forest into many pieces. Let’s make the large cave entrance load a new scene called “InsideTheCave” so we can unload most of the outside, and make this very complicated scene work well on Oculus Quest.
The cave looks like this:
Let’s start by making a collider. An easy way to do this is with a cube, because we can see the cube and we can also position it without much work. I can create a cube by right-clicking the Hierarchy window, choosing 3D Object, then Cube.
After positioning and rescaling the cube, we are now blocking the entrance with it. The user can not get into the cave without passing through the cube.

In the inspector it looks like this:
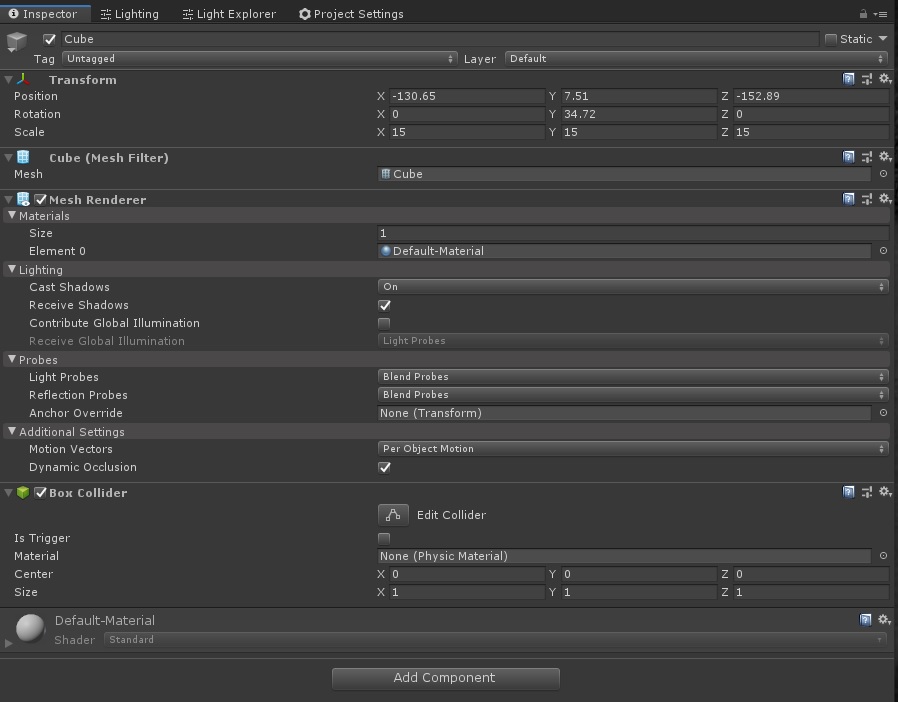
We don’t want the user to actually see the cube where we transition to the new scene, so let’s delete the Mesh Filter and Mesh Renderer components from this object, leaving only the box collider. We’ll go ahead and tick the “Is Trigger” box while we’re doing this.
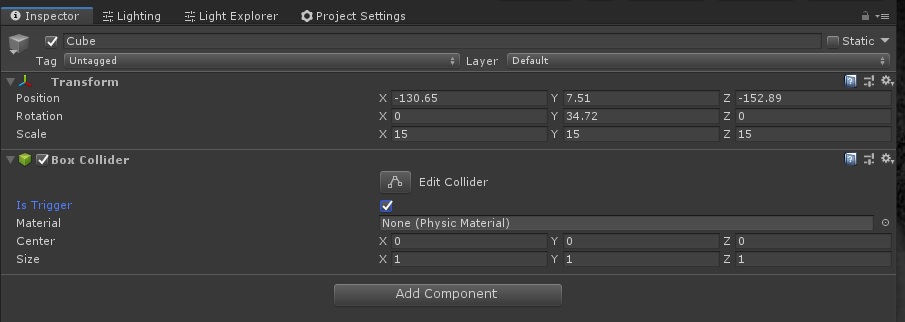
In the scene tab there’s now just a green outline representing the collider. This won’t be visible to the user, and is just here for our reference so we know that there is a collider there.

Now we need to make this collider generate our scene loading event. First we need to drag and drop the player detector onto the cube, or press the “Add Component” button and search for it.
We set the dropdown to look for the player’s head and tracked devices, because we will load the new scene whenever any part of the player is detected inside the collider.
This means we have our event creator set up, so now we need to set up its interested parties. There’s a Besti SDK tool called In Scene Events Controller that has the ability to act as an interested party to change the scene! How handy is that? Let’s set up an object with the in scene events tool on it.
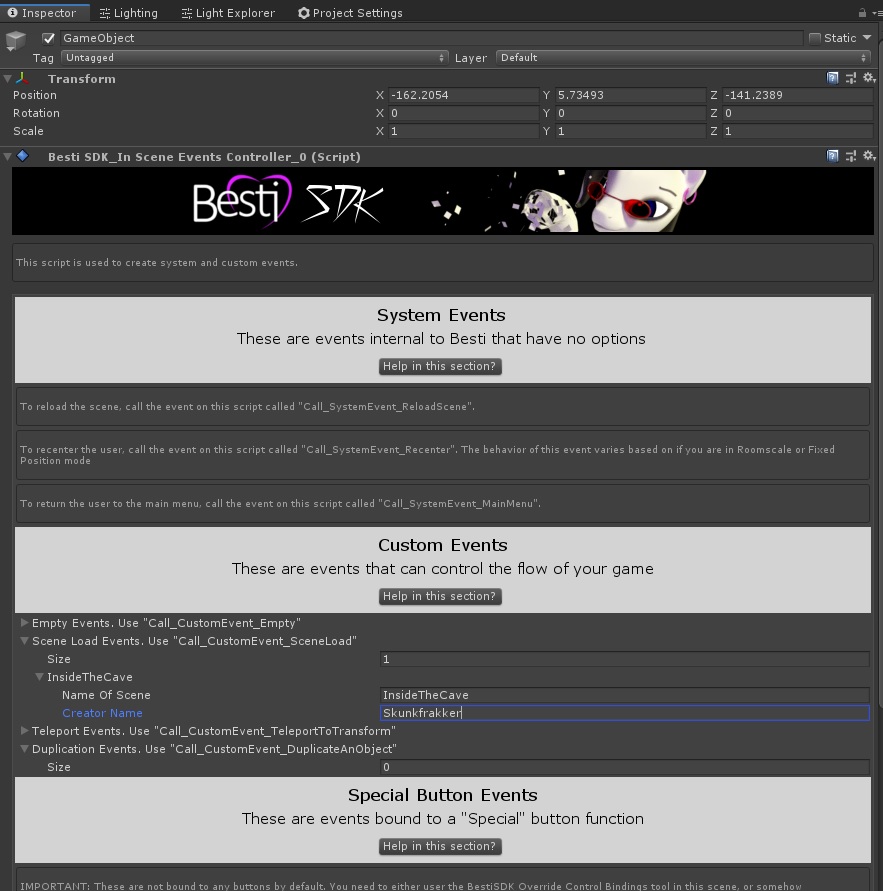
The In Scene Events controller looks complicated, but it’s really just a bunch of very simple tools all bundled together. We’re only going to use one tiny part of it, which is where it says “Scene Load Events. Use ‘Call_CustomEvent_SceneLoad'”
Let’s set it up here, for now. We can load a scene by name by providing the name of the scene (the first language set up to define the name of the scene when creating the scene) and the name of the creator. In this case, we decided that the inside of the cave scene was going to be called “InsideTheCave” and the creator name in this case is “Skunkfrakker,” but you would put whatever you specified in the scene as the creator name. We ask for both to ensure you load the correct scene.
Now we can go back to the player detector. Click the plus button on the “What happens when that is detected” box to create an interested party.
Drag and drop the object from the hierarchy window that has the In Scene Events Controller on it into the object field. It should look like this:

In this case the name of the object is the uncreative name of “GameObject” because that is the default name of new empty game objects. The dropdown that says “No Function” is automatically populated with everything this game object and any attached scripts are capable of doing as an interested party. Let’s take a look.
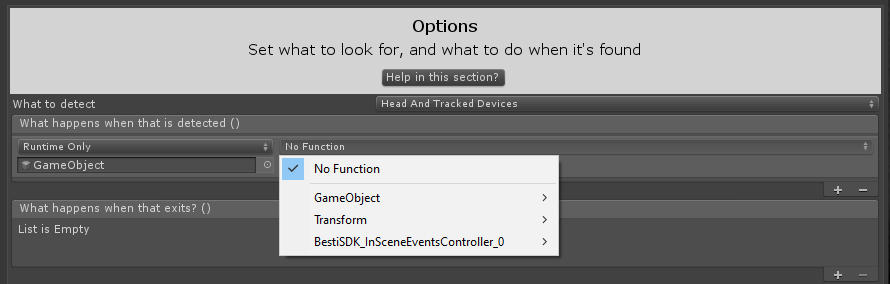
It looks like we have a lot of options! It is broken down by category. In Unity, all Game Objects have their own options, and one of the most useful ones is the “SetActive(bool)” option. This lets you hide or show the game object.
In our case, we’re interested in the Besti SDK scene loading option, because we want to load a scene. Remember how the in scene events controller has the option called “Scene Load Events. Use ‘Call_CustomEvent_SceneLoad?'” Let’s take a look at the options available in BestiSDK_InSceneEventsController

There it is, along with a host of other options that we could potentially make into interested parties. We could bring the user back to the main menu, we could recenter the user, or do a bunch of other tasks. Since we are loading a scene, we will use “Call_CustomEvent_SceneLoad (int)”
What does “(int)” mean? It means that we need to have the event send an integer (number) value, but for what? In this case it is the number of the scene we want to load. What number is that? It’s the thing we specified earlier where we wrote the name of the scene and the creator of the scene.
For reference, here’s what the in scene events controller looks like again with our data in it
Do you see how “InsideTheCave” is the first one on the list? That means it is as position 0, as computers always start counting upward from 0. If I had a bunch of these that all led to different scenes, I could have 0 be InsideTheCave, 1 be DownTheWell, 2 be InsideTheHouse, and so on.
Let’s tell the player detector to send a zero to load the “InsideTheCave” scene.

Now this is all set up. The player detector creates the “What happens when that is detected” event when a player’s head or hands are detected.
The interested party that reacts to this event is set up to be part of the In Scene Events controller called “Call_CustomEvent_SceneLoad” with a value of 0. We set up the In Scene Events Controller to react to a 0 by loading a scene called “InsideTheCave” by “Skunkfrakker”
From the user’s perspective, this will just be magic. When he or she steps into the cave entrance, the screen will fade out, and when it fades back in, he or she will be loaded into a new scene called “InsideTheCave” without needing to do anything.
What’s next?
Events aren’t limited to loading scenes. As a powerful tool, it can seem overwhelming, but over time you will consider new ways that an event can improve your game. If there is a function that you need an event to do for your scene, consider writing in and letting us know what you would like to make. If there isn’t a way, we can probably make a tool for it!