So you have a beautiful state machine, but how does the user make it work?
With a user interface! We are going to use one of the user interface tools included with the Besti SDK to set up a gaze-driven interface that lets your users step through your animation by looking at things.
You could use a traditional user interface with buttons, or you could go weird and make your user stand in specific spots to drive the animation, too. It’s up to you. For the sake of the example, let’s use the Gaze Selection tool.
Let’s start by creating an empty object in the hierarchy and name it gaze interface. Set its position and rotation to 0,0,0.
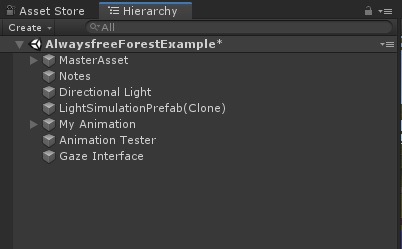
Next, drag and drop the BestiSDK_Proxy_GazeSelection object from /_BestiSDK/_Tools/ProxyObjects onto the new object we just made.
Click on it in the hierarchy tab, and it should look like this:
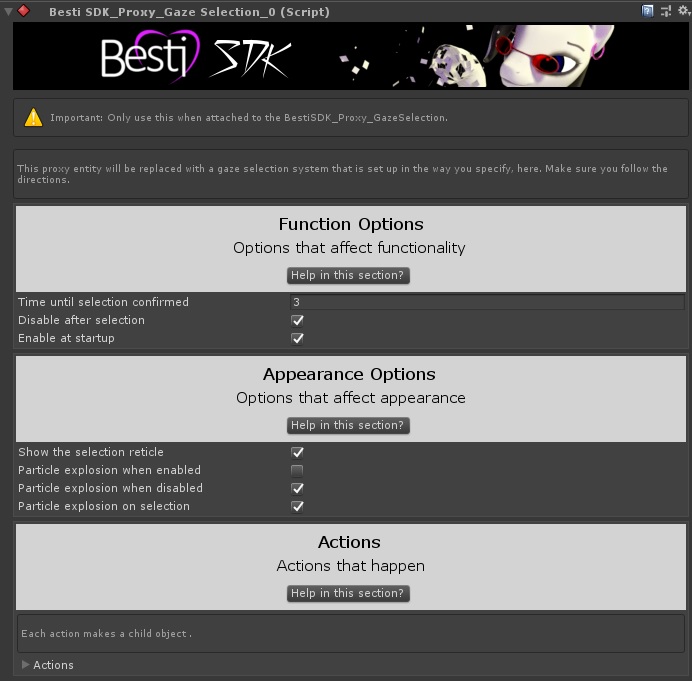
Let’s leave it at the defaults. If you’re curious about what any setting does, you can click on the “Help in this section?” button like you can on any BestiSDK tool to be brought to the online guide for that tool.
Now let’s add some tools onto the characters. The gaze selector is going to “talk” and the characters are going to “listen.” We are creating a Unity Event with these tools, and that’s a very powerful tool. Fortunately you don’t need to understand how it works to use it. If you want to know, though, we have a big-ass guide on the topic.
Go to each character and add the BestiSDK tool called “BestiSDK_AnimatorEvents.” There’s an instruction manual for that, too, if you want to read it. You don’t need to, though, because we’ll cover what you need to know here. Each character should have one of these on it.
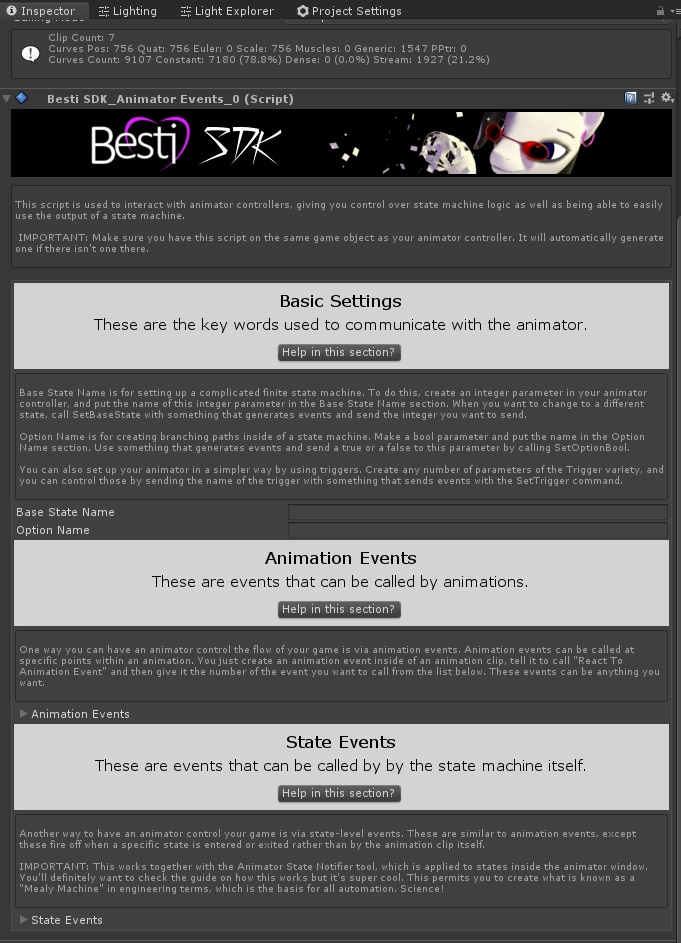
We need to populate the “Base State Name” field with the parameter we set. In this example it is “basestate” which is case-sensitive.
Once you’ve done that to both of them, you can program the gaze selector to send the desired state numbers to the animators! Let’s do that.
Go to the Gaze selection tool we put in the hierarchy tab earlier, and expand the “Actions” section. By default it will say the size is 0.

That means there are currently 0 choices available on this gaze selection. Each state needs its own choice system, so let’s say this is the first one. The first state can only go to the second state, so let’s make a single choice by changing the 0 into a 1.
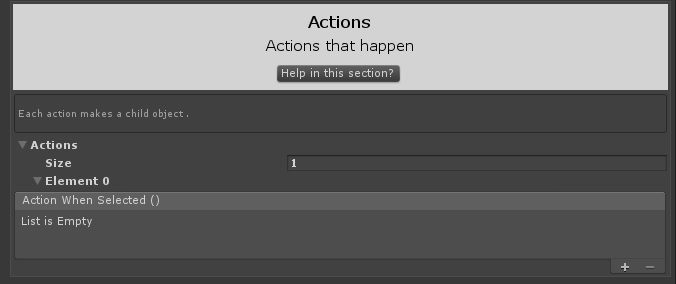
Now there’s something new. You may need to click the “Action When Selected()” box to make it expand like it is here. It is asking us what should happen when this choice is made.
If we think about how our state machine works, and we know that we are making the first available choice, we need to set the basestate parameter on both characters to 2, right?
That means that we need to tell this thing that when the user selects this choice, both animators need to be told to switch to state 2.
Click the plus button twice to create a couple actions.
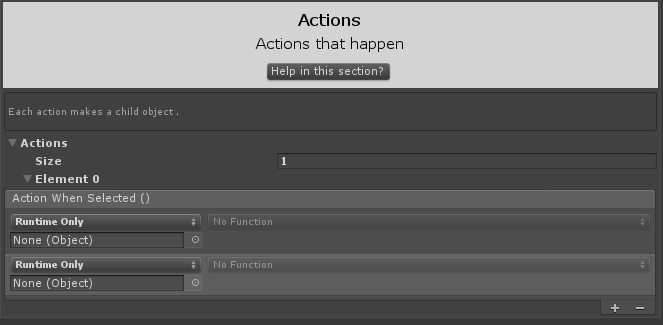
The new fields are asking us two questions:
- What object are we going to talk to?
- What do we say to that object?
In our case, we want to talk to those Animator Events tools that we put on each character. That’s the object. To populate those, just drag and drop each character (the one with the Animator Events script on it) onto the place where it says “None (Object)”
Once you do that, the dropdown on the right side will give all of the possible things that could care what this says.
It will look something like this when you click the dropdown:
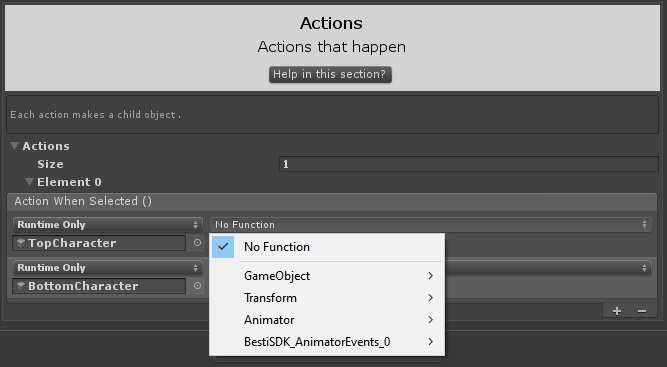
As we need to speak to BestiSDK_AnimatorEvents_0 to tell the basestate parameter to change, navigate into that.
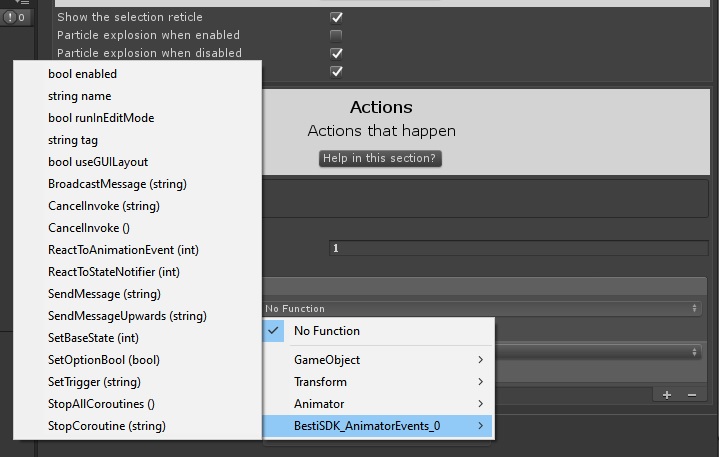
Look at all those choices! The one we care about is the one called “SetBaseState(int).” This is a cool function that lets us set the base state on an animator.
Set that on both of them. Notice it’s asking you for a number, now.
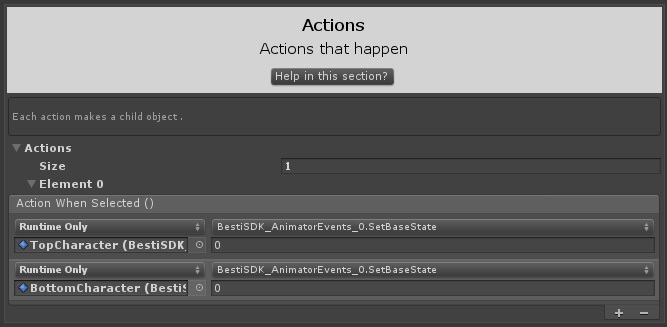
Where it currently says 0, we want this to set the desired state that we want to transition to. This menu will appear when we are in state 1, therefore, we want this choice to send us to state 2. Put a 2 in the box.
When you set up an action in the gaze system, it creates a child object on the gaze selection that represents what the user needs to look at to make the choice. It’s just an empty object, so we can specify what the selection should look like by putting a 3D object as a child to the empty object created.
Let’s look at the hierarchy tab:
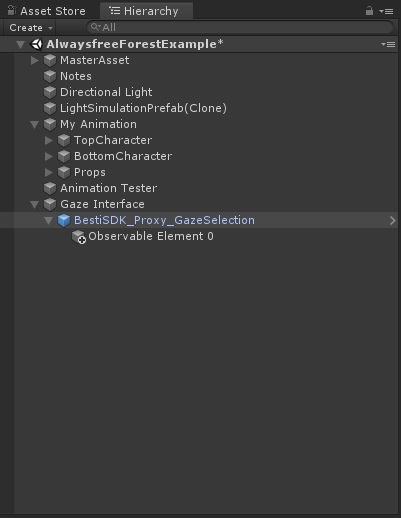
See where it says “Observable Element 0?” This is the object that represents the choice we created in the Gaze Selection tool. We need to put a 3D model as a child of that object, so the user knows he or she can look at that to advance the scene.
Let’s throw in the chevron from the tutorial files. You can find this in the Project tab under /_BestiSDK/_Examples/AssetsForSceneTutorial/3DModels. It is called just “Chevron.” Drag and drop the 3D chevron onto the object named “Observable Element 0.”
The chevron is too big and it doesn’t have a material, so let’s fix that. Create a material, and let’s make a cool semi-transparent one. You’ll find it in Custom –> AdditiveTintable. In the options on that shader you can set it to some cool color.

Now we need to position and scale this object. Just like when we moved the characters when positioning and scaling them, make sure you do it to the main parent object. That way everything comes together. The actual thing that Besti is checking to see if you’re looking at is the game object called “Observable Element 0” so if that ends up separated from the chevron because you moved the chevron by itself, the interface won’t feel right.
In the example I changed the scale of chevron to 0.3, 0.3, 0.3. I rotated the chevron to 90,0,0, and I put it right here.
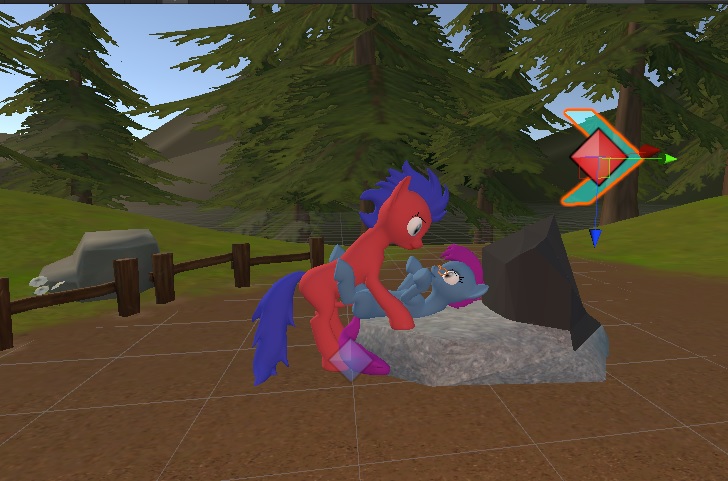
That’s it for the choice that is available in state 1, so let’s make the option system for state 2. This one will be a little different.
Thankfully we can base the second one off of the first one. Give the first one a good name (like “Choice for loop 1”) and then push CTRL+D to duplicate it.
To make it easier to see what is going on, you may want to disable the other choices once you’re done with them. Just remember to turn them on later. Disable objects by clicking on the object, then click the checkbox in the upper left corner of the inspector tab.
To set up loop 2, we need to change a couple of the settings. Unlike loop 1’s choices, we don’t want this one on until we’re actually in loop 2. We will set that up in a moment, but let’s uncheck the “Enable At Startup” checkbox on the gaze selection for loop 2.
Loop 2 also has two options instead of 1. Let’s add another action to the actions list by changing it from a 1 into a 2.
It should look like this:
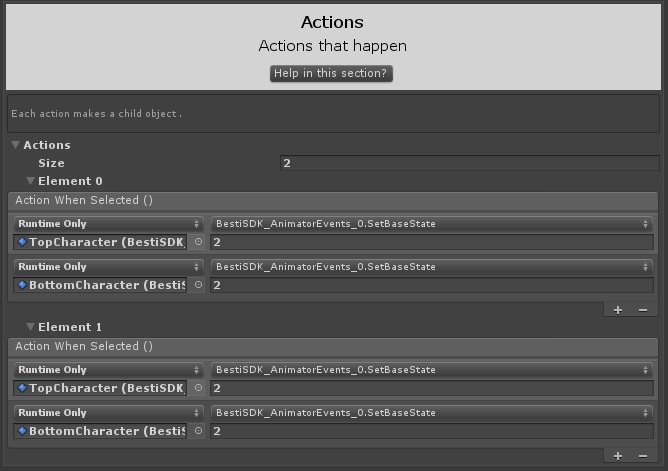
Because this one has two choices, we need to tell one choice to bring us back to state 1, and we need the other to take us to state 3.
I will make Element 0 take us to state 3, and element 1 take us to state 1.
Now I just need to bring over the chevron a couple times from where we put it on Choice For Loop 1. I can duplicate the chevron in the hierarchy tab inside of Element 0, and drag it onto both element 0 and element 1 of the Choice For Loop 2.
Since element 1 is going to take us back instead of forward, I’ll flip the chevron on that one around 180 degrees, which is -90,0,0 on the rotation, then scoot it over a little bit. I scoot the object named Observable Element 1 instead of the chevron itself, because Observable Element 1 is what Besti is actually looking at.
It should look like this in the scene and hierarchy tabs:
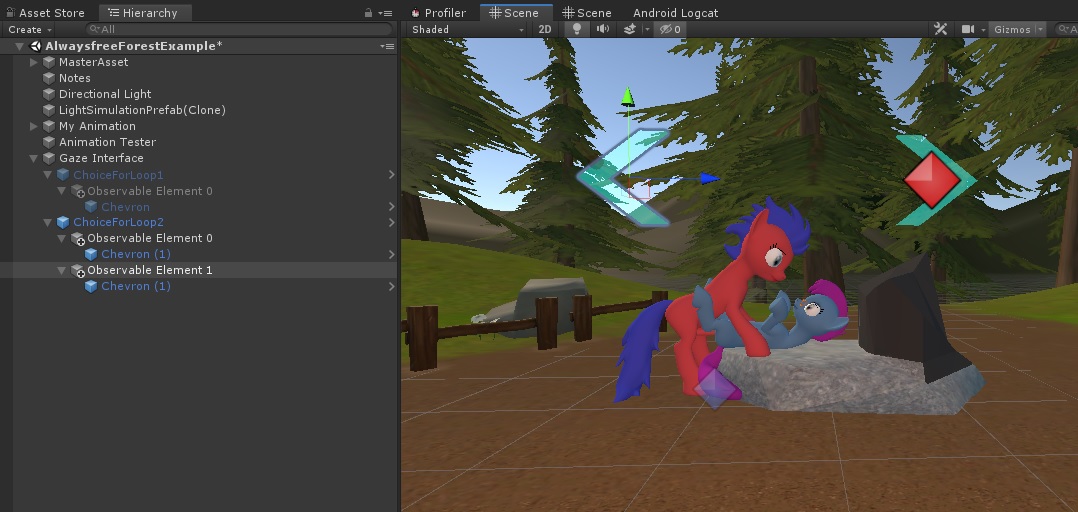
And its actions look like this:
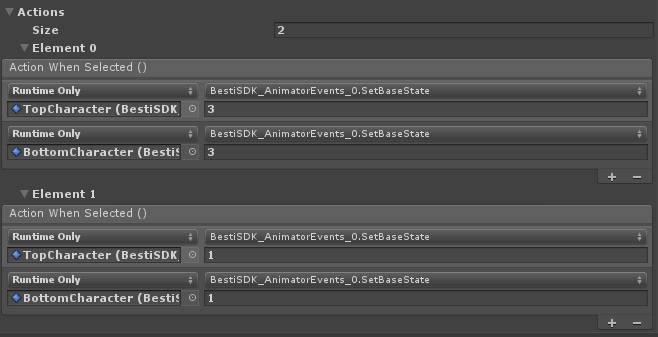
Now we just need to create the two remaining gaze options. Choice for loop 3 should take me to 4 and 2, and Choice for loop 4 should take me to 1 and 3. I won’t need to duplicate the chevrons on those, either. They’re exactly the same as loop 2, so it won’t try to rebuild the list of actions and accidentally take my chevron with it (this is a bug we’re working on!)
Once that’s done, all we need to do is program the moments where we activate and deactivate the gaze menus. The easiest way to do this is to have the state machine notify one of the animator events to activate the correct menu when it should be displayed.
Let’s set up the animator event side of that first. Head over to each character examine the “State Events” section.

There are 4 menus, so let’s add 4 entries to the “State Events” toward the bottom on each one. They should both look something like this:
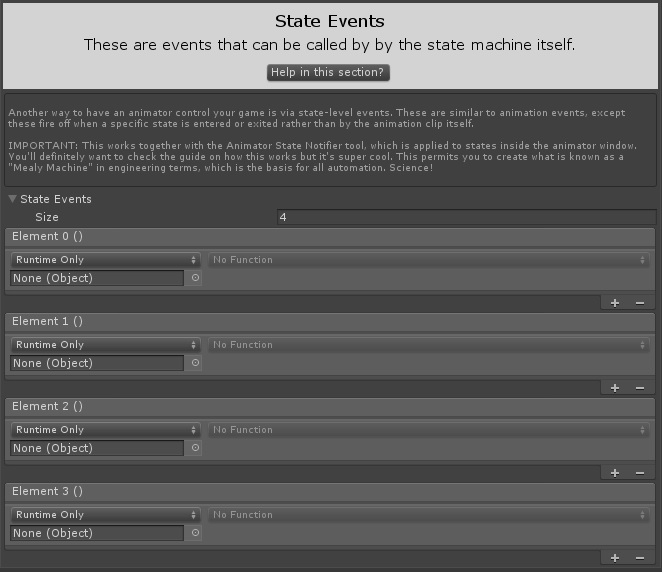
We need to do this on both of them, because both characters are sharing an animator controller. That means that if we have the state machine perform some action on one of them, it will do it on both.
Now on one of them, populate the “None (Object)” fields with the gaze controllers, and for each of them, choose “EnableGazeSystem.” That will look like this:
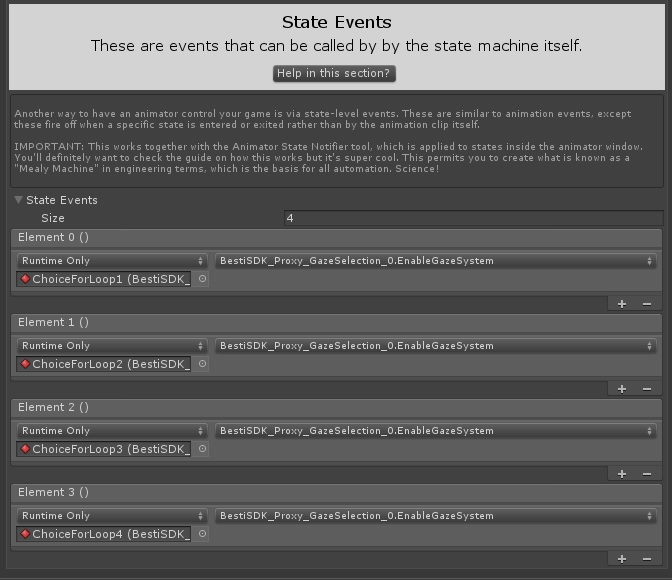
Now that we have this set up, let’s go into the state machine and tell it to fire these at the right times. Ideally, we want the interface to appear for the available choices when the user can make these choices, so we need to add something to loop 1, loop 2, loop 3, and loop 4.
Let’s look at the state machine by clicking on the character that has the main animator controller on it, then look at the animator tab.
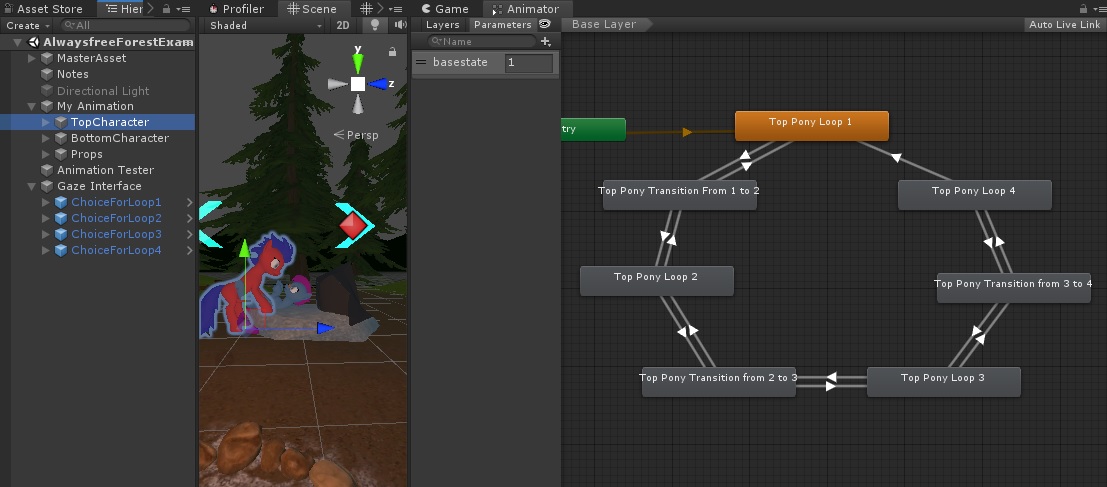
Select the first loop and add a Besti SDK tool called Animator State Notifier to it. This tool lets the Animator Events tool know when states are entered and exited. That looks like this:
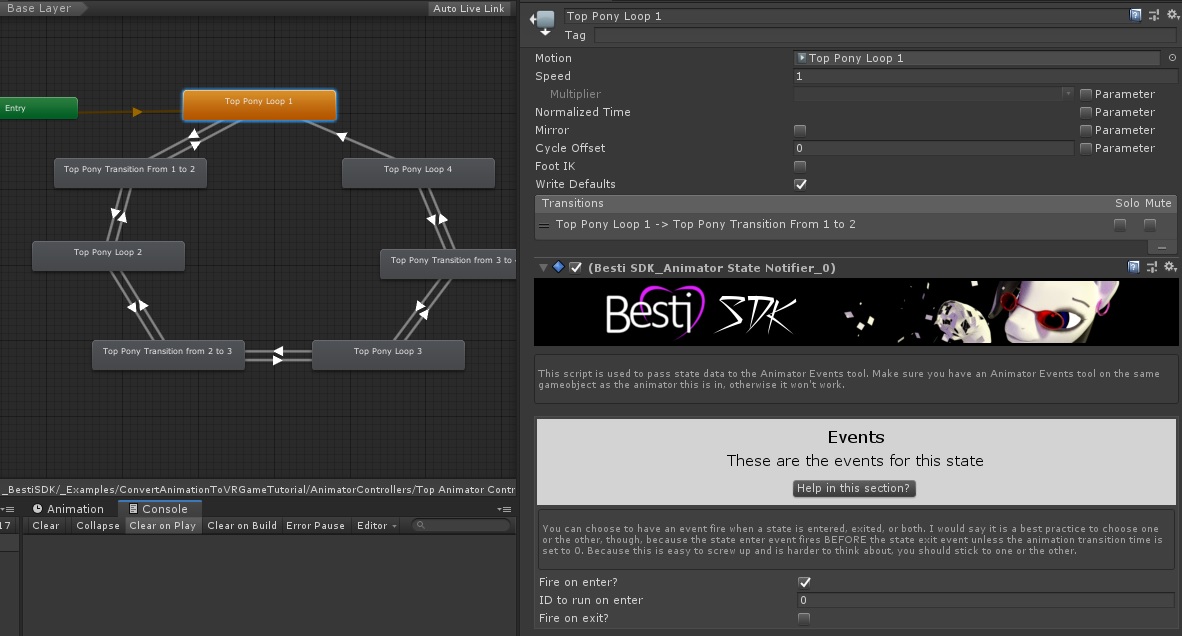
We have the choice of notifying the Animation Events controller when we enter this state, and when we leave it. Let’s check the box for “Fire On Enter” so we notify when we enter.
ID to run on enter is the index we set on the Animator Events tool that told each of the Gaze Interface tools to turn on when we reached specific points. The number you put here is the number on the list that it will run. The way I set this up in the example was:
- Index 0 on Animator Events –> Activate Gaze for state 1
- Index 1 on Animator Events –> Activate Gaze for state 2
- Index 2 on Animator Events –> Activate Gaze for state 3
- Index 3 on Animator Events –> Activate Gaze for state 4
As we are on the animation for loop 1, we want to send a 0 on the first one. For “Top Pony Loop 2” we would set a 1, for “Top Pony Loop 3” we would set a 2, and for the last one, we set a 3.
That’s it! Now we have a user interface that can drive the animation forward and backward. Let’s make some noise!
Quick Navigation
Part 3: Setting up the Besti SDK
Part 4: Exporting your cartoon for Besti
Part 5: Importing your cartoon in Besti
Part 10: User Interfaces (You are here)
Part 13: Distributing your content
