Holy shit you made it! It’s now time to test your creation by rendering your scene to Besti X. This is done through the “Master Asset” which should be in your hierarchy tab.
Find it, click it, and let’s take a look:
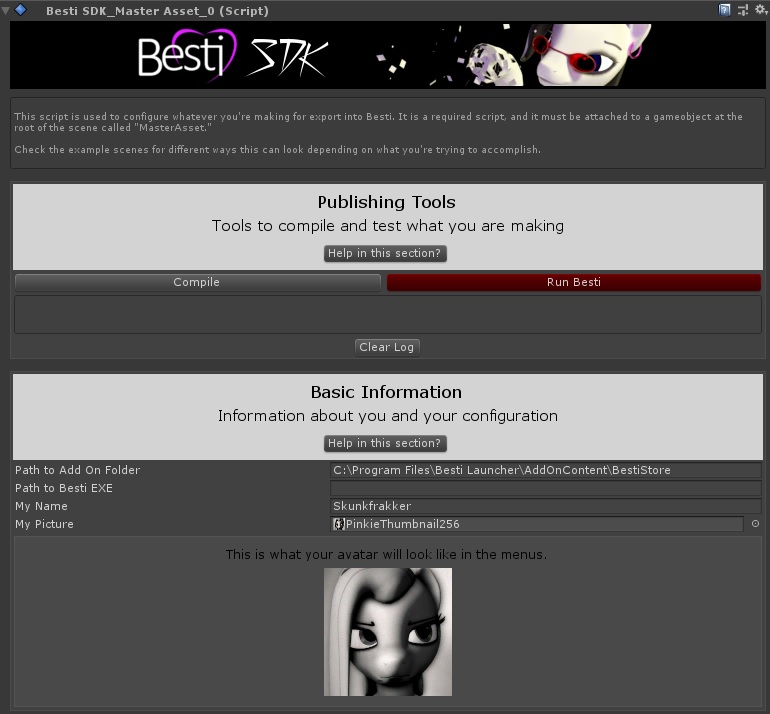
Your objective is to go down the whole tool and fill out things as appropriate. Most of these are pretty obvious and you were in here for the lighting segment, but let’s go over what each really important option does.
The big compile button at the top does just that, but don’t push it yet. We need to change some settings around, first.
The Basic Information section should have the “Path To Add On Folder” filled out. This is the default location the installer will put it in, but if your copy of Besti X is somewhere else, you want to tell the compiler here. This path is where it will put the two files it creates that run in Besti X, and Besti X automatically checks the “BestiStore” directory in the launcher so that’s where you want it.
The My Name field is what it shows as the creator of the scene in the menus. Put your name in there that you want people to be able to see.
The My Picture field is pointing towards a picture file you want to use as your avatar. Drag and drop your avatar picture into the Project tab, and then drag that into the My Picture field. If it isn’t the right size, it will give you the option to resize it automatically.
Let’s continue!
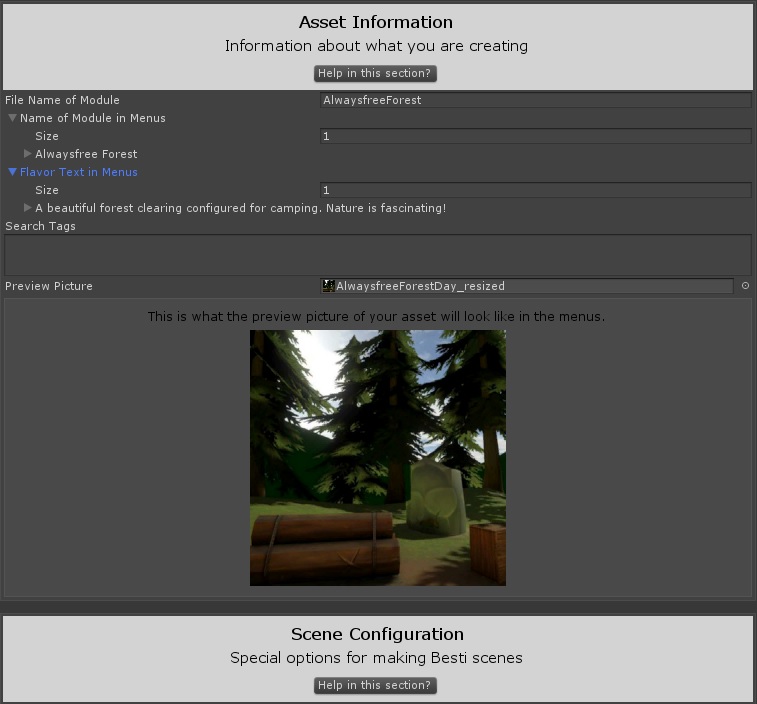
The File Name of module is going to be the file name of the two files it puts in the BestiStore directory. The files will be named what you write here plus .ibms and .ibmi. Name it something cool.
Name of module in menus and flavor text in menus are how you describe the scene in the menus. These give you the option to put up different descriptions in English, Russian, and German, so if you want to have multilingual descriptions in the menu, go for it.
The Preview Picture works very similarly to the avatar picture in the previous section. Make a picture, put it in the Project tab, then drag it into that field. It will prompt you to resize the picture if it isn’t the right size.
Next!
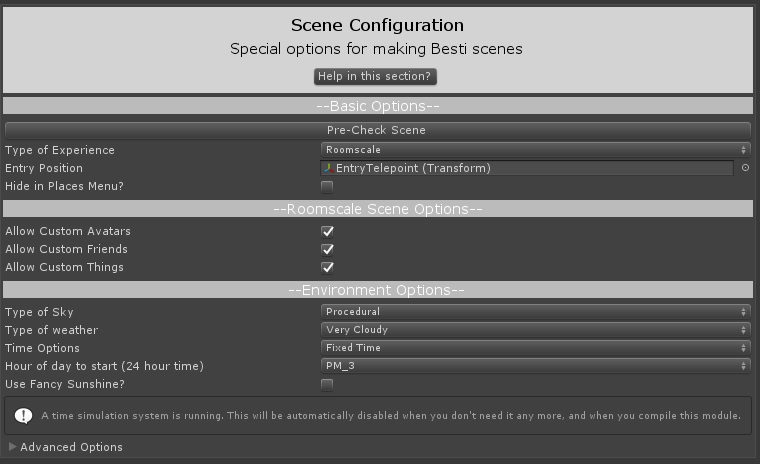
We were here earlier when lighting the scene, but let’s look at the other options that will affect us.
The “Type of Experience” dropdown is a significant one. In Roomscale, the user can wander around the VR environment. In the other mode, fixed position, it’s designed to be viewed from specific positions. If you made an animation that was done from a first-person perspective, for example, you would probably want Fixed Position, because that lets you determine where the player’s head is located and which direction it is facing.
The Entry Position is what determines the starting position. In Roomscale, the entry position is where the user’s feet are at the start. In Fixed Position, the entry position is where the user’s head is.
The other options not covered here aren’t relevant to this example scene, but if you want to learn more about them, there’s a comprehensive guide on every option you can check out.
If you’re ready, hit that compile button and see what happens! If everything works out, it will grind away for a couple minutes while showing you a progress bar, and at the end, a text window should pop up saying how everything went.
If everything went OK and you don’t see any big ERROR signs, you’re all set and it’s waiting for you to play it in Besti X on the PC.
If you want to build for Quest, you just need to make a minor change. In the menu bar at the top of the screen, click “File” then choose Build Settings. Click Android along the left side, then this menu will pop up.
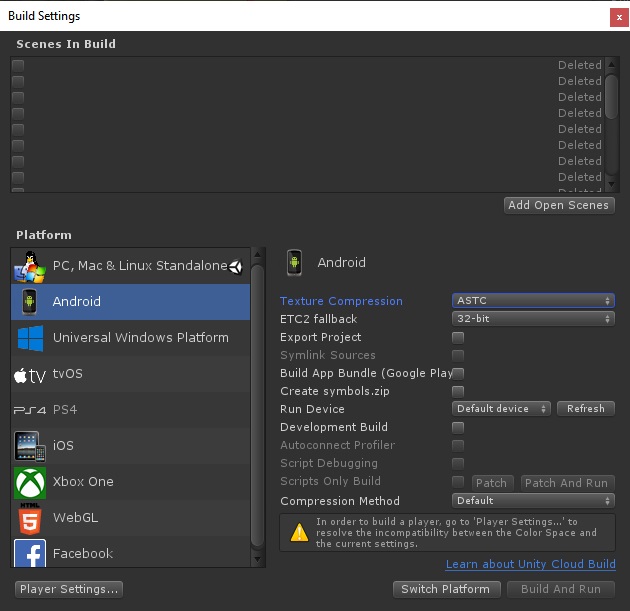
Make your settings look just like this, then hit the “Switch Platform” button.
Go get a coffee because this takes a few minutes. Once it’s done, the build button will make Android-compatible ibmi and ibms files. Drag and drop those into the Besti Store folder with your Quest plugged in USB, and start what you made from the menus in-game.
If everything did NOT go OK and you do have error signs, check what they say. In general, the error messages will tell you what went wrong, and how to fix it.
If it’s not working and you’re super stumped, a complete and ready-to-compile version of this tutorial is in _BestiSDK/_Examples/ConvertAnimationToVRGameTutorial/FinalScene. Contrast that with what you did and see if you can find the problem.
Next Step: Distributing your content
Quick Navigation
Part 3: Setting up the Besti SDK
Part 4: Exporting your cartoon for Besti
Part 5: Importing your cartoon in Besti
Part 12: Rendering to Besti X (You are here)
