The first step to designing game logic is to decide how the game will work. Once you figure that out, it just comes down to putting stuff together.
The way this example should work is as follows:
- At the start of the scene, the characters will be doing the Loop 1 animation. Choices will be available to move to the next step.
- When the user chooses that, we play transition 1 to 2, and then play loop 2. When loop 2 starts, we will have the option to go forward or backward.
- We will go this way until the end, and then we will give the option to start over.
Shouldn’t be too tough!
Let’s start with an animator controller. This is a program that makes animations in Unity, and it has the ability to talk to the Besti tools that let you program animations without coding anything.
Each character needs an animator controller component. If you’re following this tutorial you will already have one on the parent object to the meshes and skeleton of each character. In the example here those are the objects called “TopCharacter” and “BottomCharacter.” You can check this by clicking one of the characters in the Hierarchy view, and then look in the inspector for a component called “Animator.”
If you don’t have one on each character, go ahead and add one by clicking the “Add Component” button, then type in animator and choose to add what it finds.
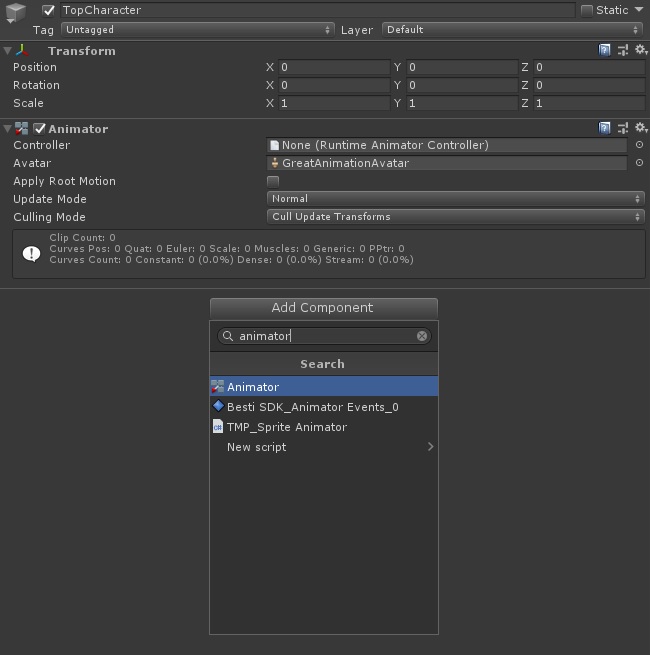
Now that we have the animator component on each character, we need to create one Animator controller. Both characters will have an animator, but we are going to just create one controller. You can animate multiple characters with multiple controllers, but in situations where you need characters to have synchronized animations, there’s a better way which we will do.
Right click in the Project tab and choose Create –> Animator Controller. Rename this appropriately. I’m going to name it “Top Animator Controller”
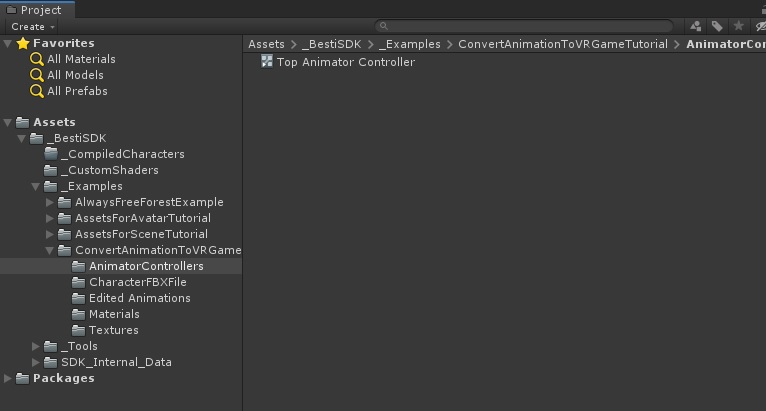
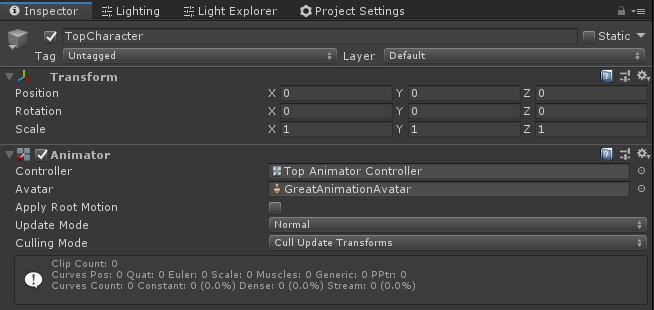
Now drag and drop that onto the Controller field in the Animator component of the Top character.
Now we are going to create something called a “state machine.” State machines are all around you, and it’s a broad enough concept that we’re not going to cover it very much here. We’re going to use it to make porn, though, so let’s exploit over a century of scientific research to make these cartoon horses have sex with one another.
Look for the tab in Unity called “Animator” Not “Animation” that’s different. We want “Animator.” If you don’t have an animator tab, you can make one by clicking in the menu bar on the top of the screen Window –> Animation –> Animator.
When you click on the top character in the hierarchy and have an animator tab open, you should see something like this:
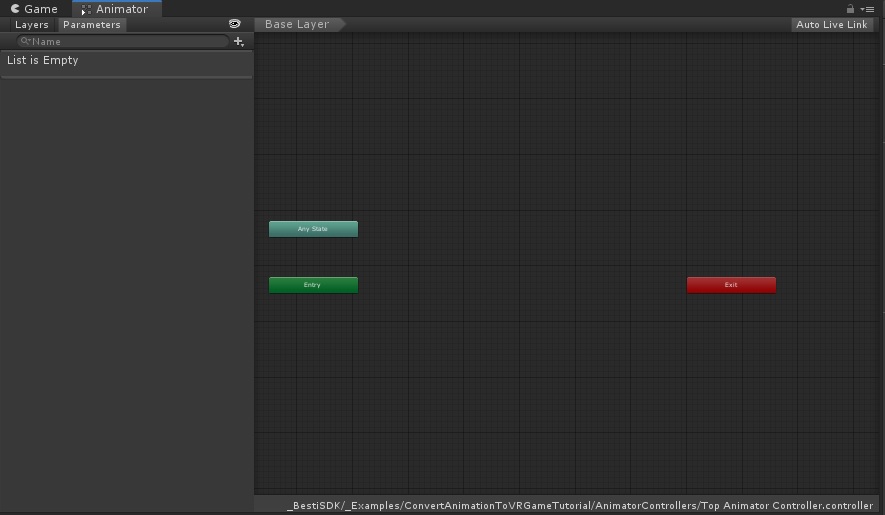
The first thing we want to happen in this scene is for the characters to start playing loop 1. We will tell the animator this by dragging and dropping our copy of Top Pony Loop 1 into the animator window. It will look like this:
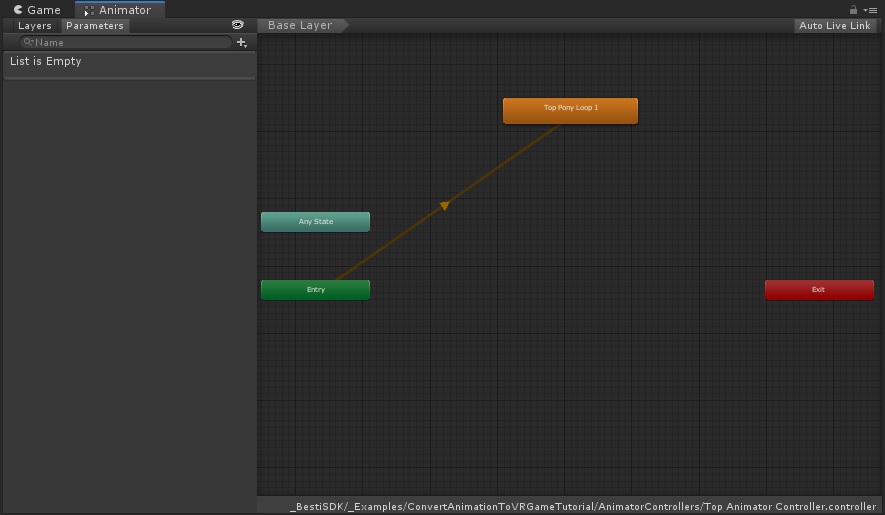
To visualize this, imagine we’re making a path. We start at “Entry” and then walk along the yellow arrow to Top Pony Loop 1. Our animation has a lot of steps, so let’s bring in the rest of the Top pony animations. You can organize them however you want, but I try to make it make sense visually. Since this is an animation that loops back to the beginning at the end, I’ll make a circle out of the different animation clips.
Here’s what it looks like with all of the animations in there.
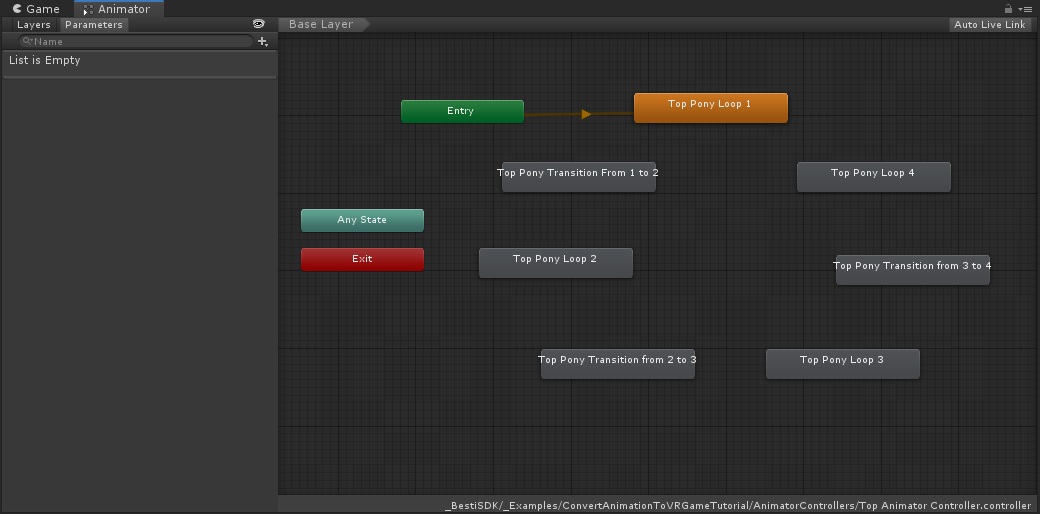
The way this should work is that we should walk around the circle in a counter-clockwise way. Let’s put in more arrows so the computer knows this. Right click on an animation clip and choose “Transition” then click on where it should go next.
Remember also that we can work our way backwards through this, so we’ll also make arrows going the other direction.
Here’s what it looks like all wired up:
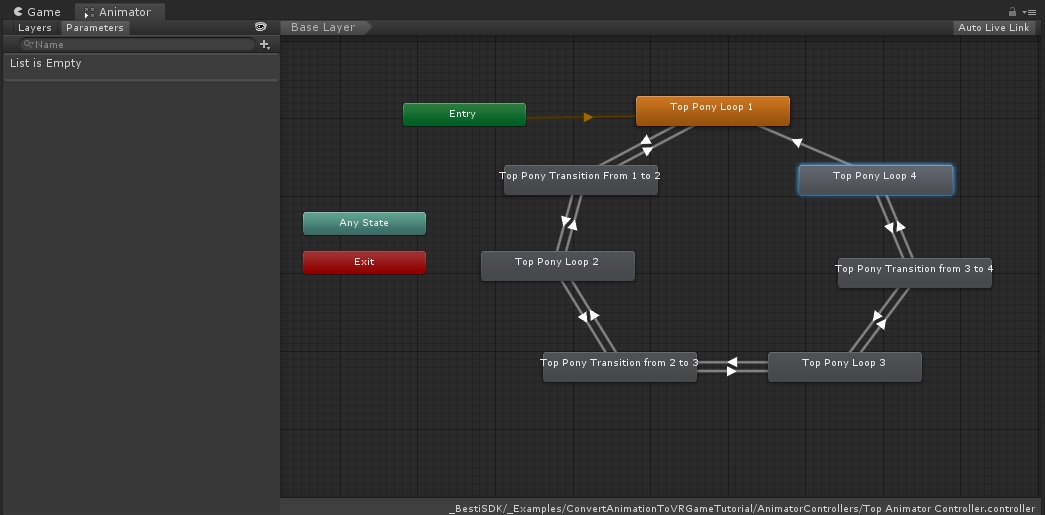
Looking at this visually, we can see how we can now follow arrows all the way around the circle and end up at the beginning again. We can’t go from Top Pony Loop 1 to Top Pony Loop 4 though, because that arrow only flows in one direction. If we wanted to be able to go directly from Top Pony Loop 1 to Top Pony Loop 4, we would need another arrow.
You can see how this can quickly get very complicated. Look at what the state machine for Besti 9’s “Laying” position looks like:
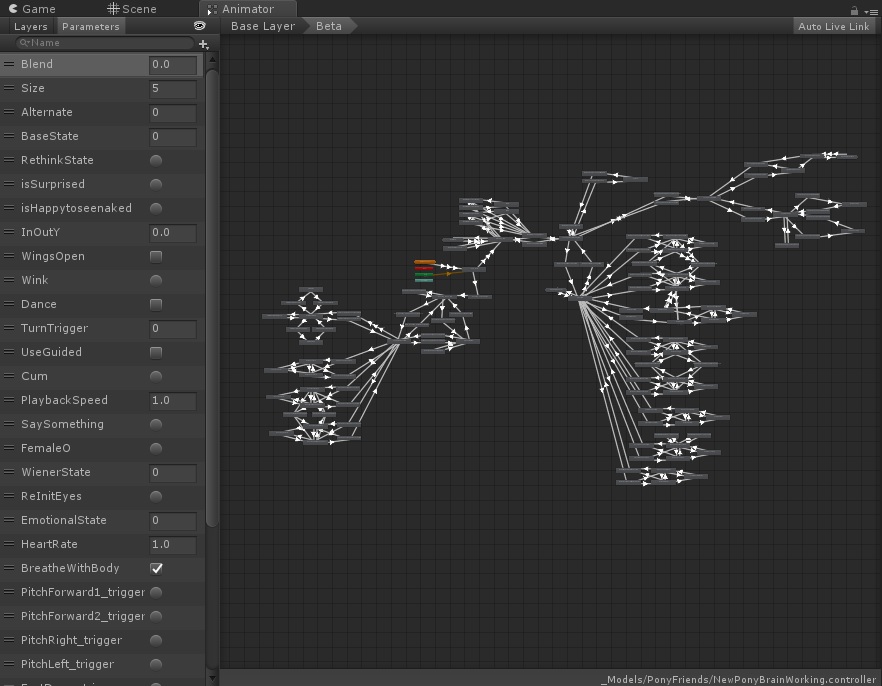
You could make Besti 9 in the Besti SDK, but we’re not doing anything that complicated. Instead, let’s have 4 states, with each state landing on a loop.
- If we are in state 1, we will travel to loop 1 and stop there.
- If we are in state 2, we will travel to loop 2 and stop there.
- If we are in state 3, we will travel to loop 3 and stop there.
- If we are in state 4, we will travel to loop 4 and stop there.
Once we are done setting up our animator controller, we will give the user buttons to push or look at that change our state number, thus driving our game.
First we have to set up state numbers, and to do that we need to create a parameter. That’s easy, we just need to click the Parameters tab inside the Animator, then the plus button, then choose an INT parameter.
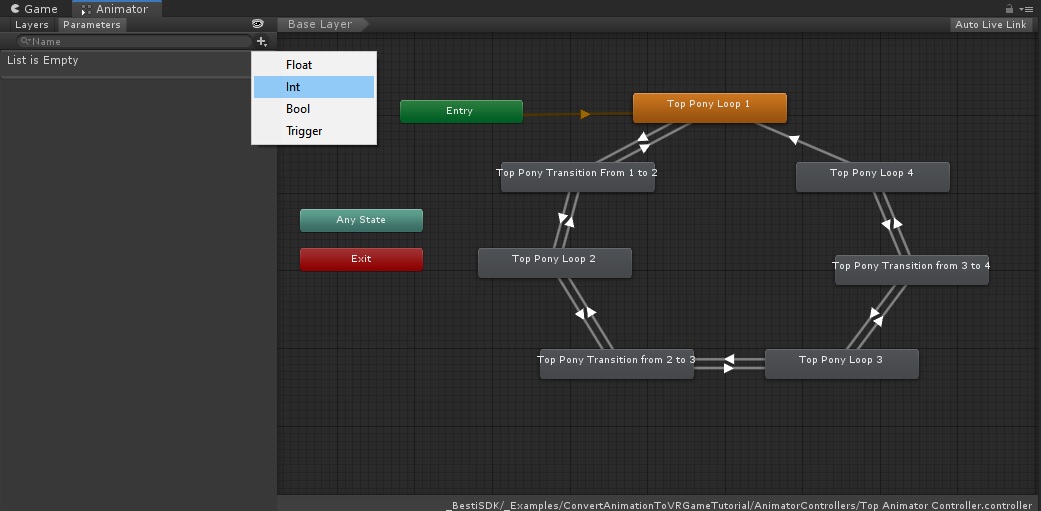
This will make a parameter called New Int, but we should rename it to something better. I’m going to name the parameter basestate. I’ll also set it to be 1 by default, instead of 0, because we’re going to start from the first state.
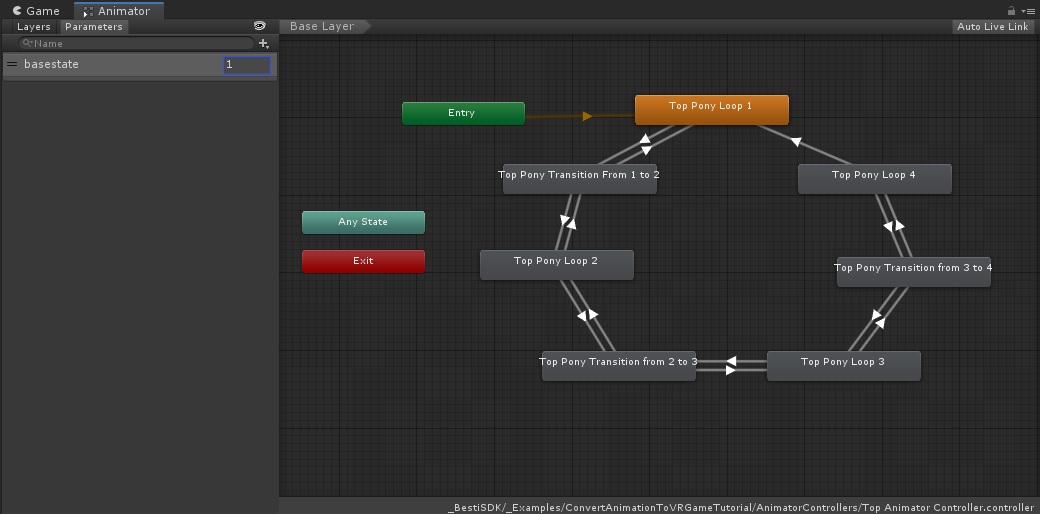
Now we need to set rules that make the system actually walk down this path. The parameter we set will let us do that. An animation can flow into the next animation on its own, or we can make it stop and wait for one of the parameters to be true. You specify that by clicking on the arrows.
Click the arrow going from Top Pony Loop 1 to Top Pony Transition from 1 to 2, and look in the inspector.
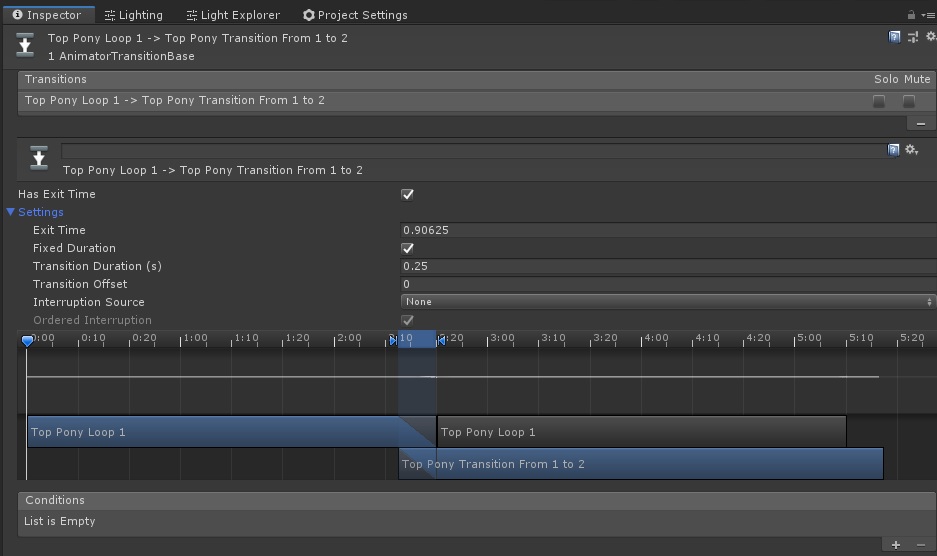
At the top is the “Has Exit Time” checkbox. If this is checked, it will automatically transition from this animation to the next once this animation is over. Even if you set the animation as a loop, it will go to the next animation at the end of the first loop.
We don’t want this, because we want the first loop to loop itself until the user says it should continue. Let’s uncheck that.
The fixed duration checkbox changes how this animation blends into the next one. It’s personal preference on how you do this. When it is checked, the blend to the next animation will be measured in seconds, whereas when it is unchecked, it will be in the percentage of the length of the animation we are coming from. For example, if Loop 1 was 10 seconds long, and I wanted to set a 25% transition, it would take 2.5 seconds to transition from Loop 1 to the next animation. Let’s leave fixed duration checked.
Transition offset and interruption source are for different workflows than we’re doing here, so you can ignore those.
Towards the bottom are the conditions, and we do care about these. This is the condition that it is waiting for to make it ok to transition to the next animation. As we are using the basestate parameter to say when it’s time to go to the next animation, let’s say to transition if the basestate is greater than 1.
This transition looks like this:
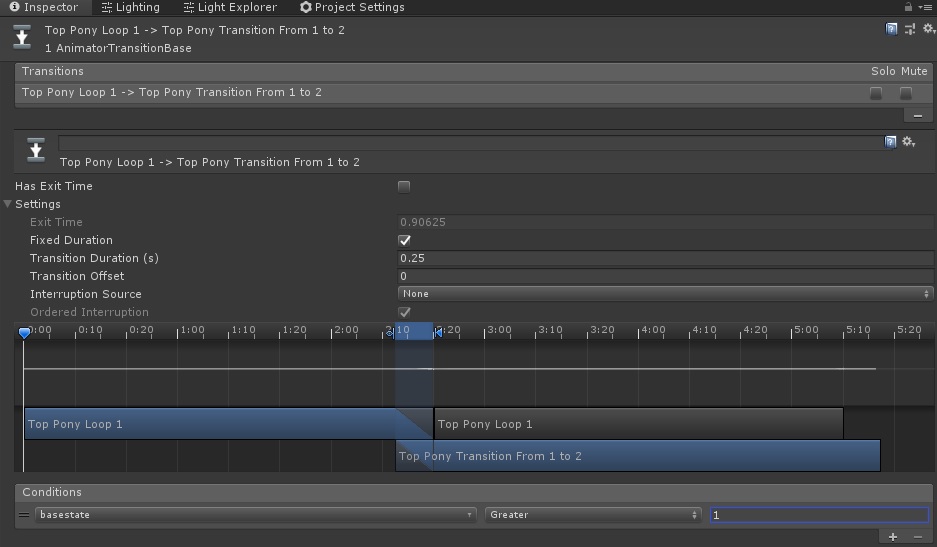
Let’s think about what happens here now that we have set this. If the basestate parameter is 0, what happens?
Nothing will happen, because there is only one transition out, and that transition will only happen if the basestate parameter is greater than 1. The same will happen if the basestate is 1, because 1 is equal to 1; not greater than 1. The only situation where this will do anything is when basestate is 2 or higher. If it is not 2 or higher, it will just play Top Pony Loop 1 in a loop.
This is why we set that animation to be a loop, by the way. If you didn’t check the loop box, the animation would play once, and then stop playing until one of the conditions to transition to the next animations became true.
Now let’s go to the next step and see what the next transition will be. In this example, it is the transition between “Top Pony Transition from 1 to 2.”
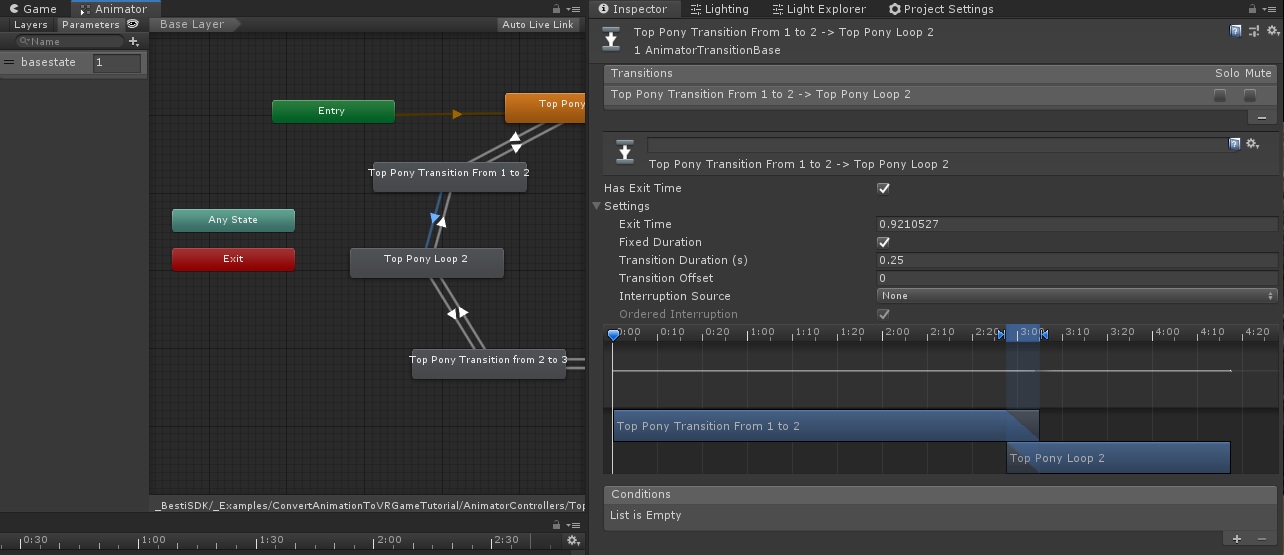
In this case, we actually do want it to automatically play the transition once, and then move onto the next loop, so we want to leave the “Has Exit Time” box checked. Should we set a parameter?
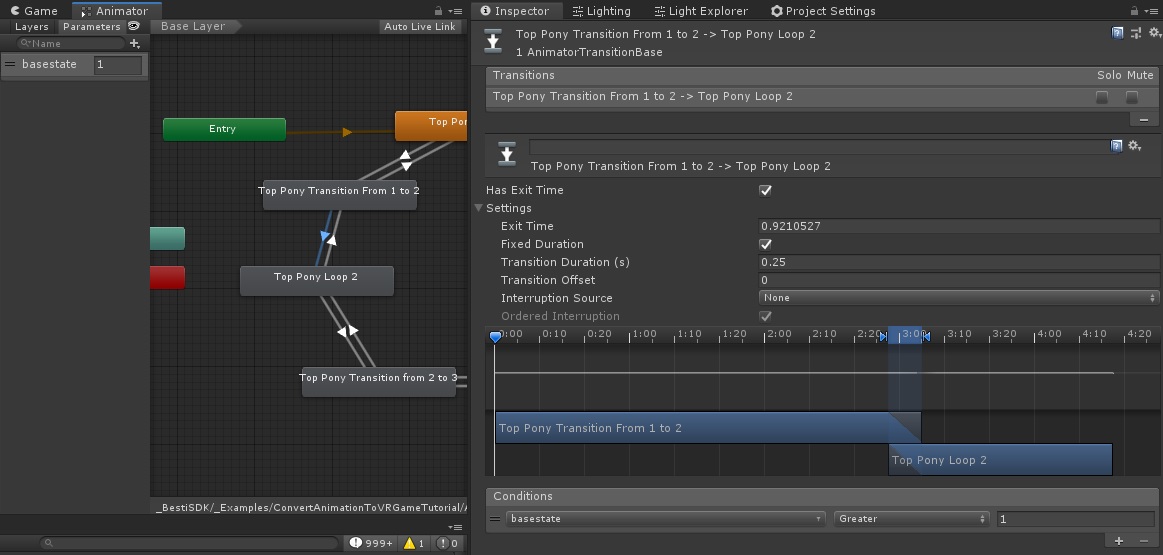
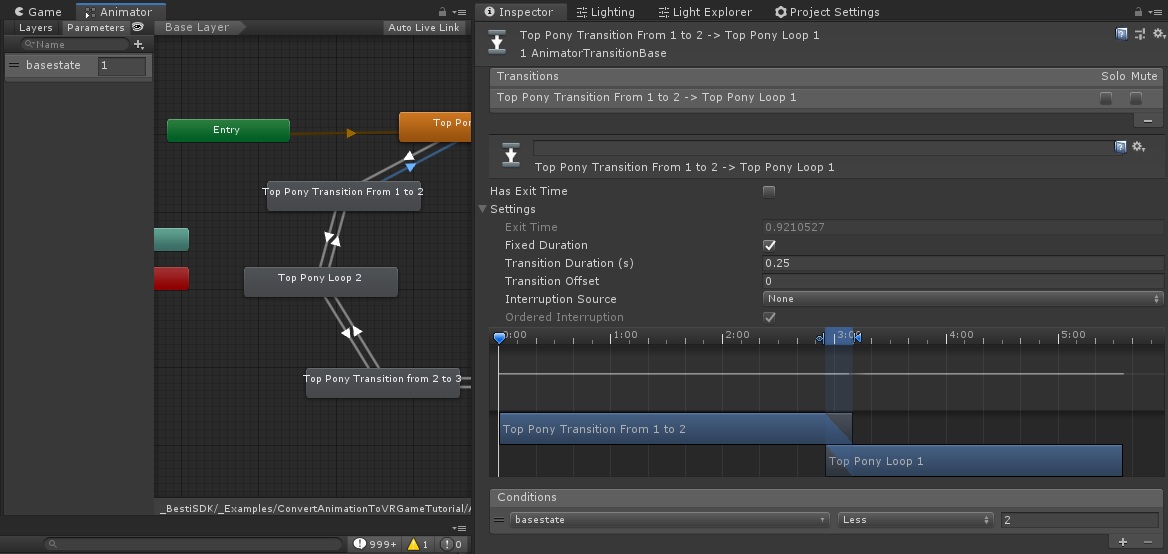
Yes we should! If we don’t set a parameter, we won’t know which direction it will go, because the transition from “Top Pony Transition from 1 to 2” to “Top Pony Loop 1” would be true at the same time, which is bad. When that happens it will just pick one randomly, and it might not be a good option. We will set this to also require basestate to be greater than 1, and we will set the other direction to be basestate less than 2.
Here’s this transition properly set up:
And the route that goes clockwise:
Let’s continue going counter-clockwise. This time let’s look at the transition going from Top Pony Loop 2 into Top Pony Transition from 2 to 3.
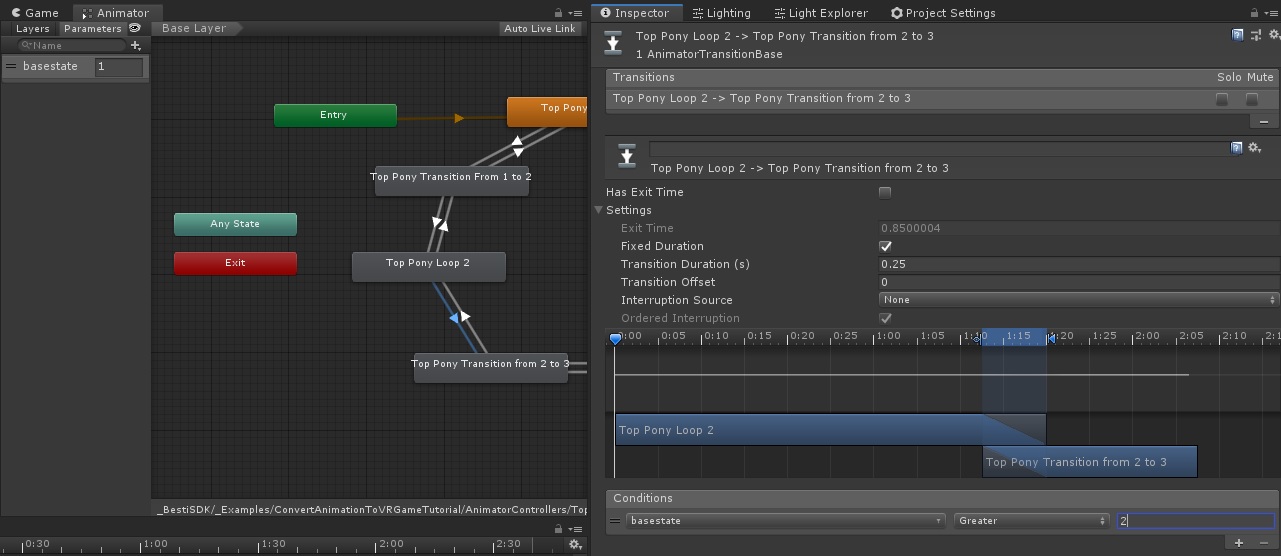
Because this is also a loop, we want to get stuck here and loop this animation until the user pushes the button that makes us go to the next or the previous state. Because this one is going to the next one, we will set the transition to happen only if the transition is greater than 2. We also want to uncheck “Has Exit Time” because we don’t want it to exit on its own. We only want it to exit when a parameter is true.
What about the arrow that goes backward from here? The one that leads from Top Pony Loop 2 to Top Pony Transition from 1 to 2?
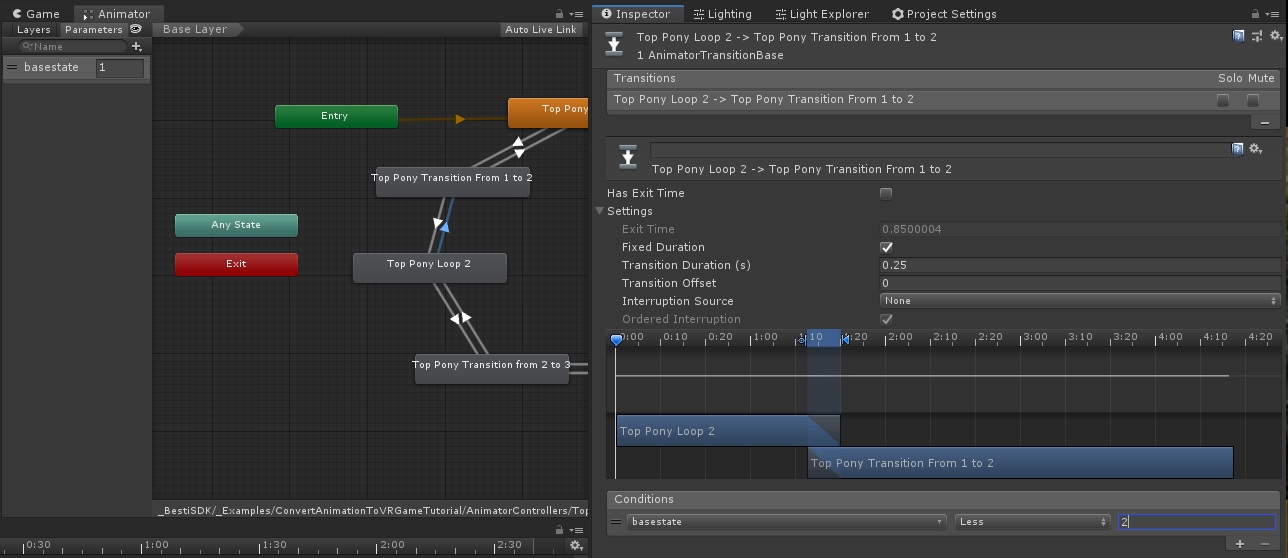
If you guessed that we should set a condition that only works when basestate is less than 2, you’re right! That means that when we are on Top Pony Loop 2, it will only stay there if basestate is equal to 2. If it is less, we go clockwise. If it is more, we continue going counter-clockwise.
Continue setting up all the of the arrows like this until they’re all set up except for the last section, which in this case is Top Pony Loop 4, because that one’s going to be a little different.
Let’s check that one out:
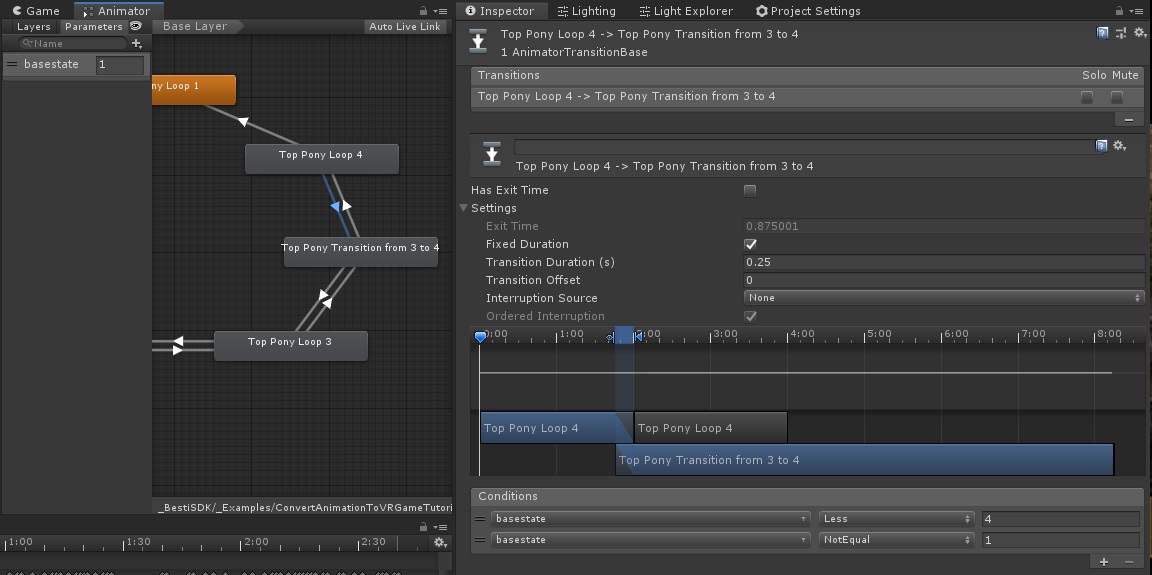
This is the transition back from loop 4, and this one is different. In this case, we will give the user a button that sets state 1, or state 3. We can’t just do a less than 4 here, because 1 is also less than 4, and both exits would be true if we set the state back to 1.
What we can do here is create multiple parameters. All parameters are a logical “AND” meaning that both of the parameters must be true for the whole statement to be true. In this case, this transition will only happen if the basestate is less than 4 AND not equal to 1. That means that if it is 3, which is the immediate previous step, this will work.
What about the arrow going back to the beginning?
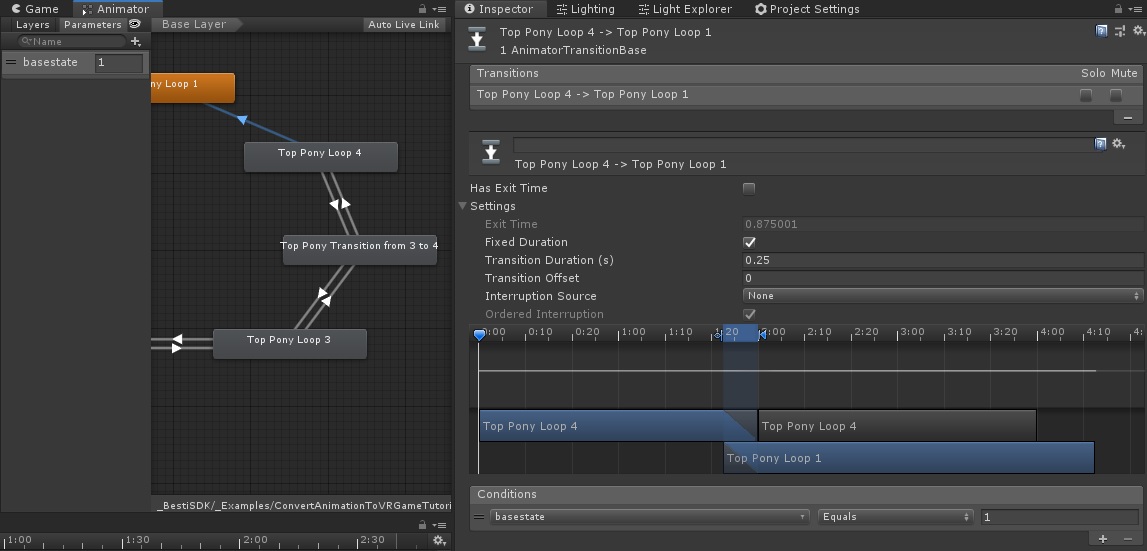
For this one we want to set the only situation that the other arrow would ignore, which is to use that transition only if the basestate is equal to 1.
At this point your animation for your top character is all wired up, and you have the ability to test it before you make buttons for your user to push.
Make your tabs show you both a “Scene” tab as well as the “Animator” tab, and push the big play button at the top. While it is playing, you can manually adjust the basestate parameter and follow along as it plays your animation. The console will spit out constant errors because there is no player or camera, but that’s OK. We are just testing the characters to make sure the animation works, and moves from state to state correctly.
How do we make the other character work? Surely we don’t need to do all of that again, right?
Nope! You could if you wanted to, but in most situations there is a better way. For this we will use what is called an Animator Override controller, which is just a copy of the other animation where we can change the clips.
Create one of those by right-clicking in the Project tab, then choose Create –> Animator Override Controller
Click on the new thing you created in the Project tab, and at the top you will see a field called “Controller.” Drag and drop the animator controller with all of the transitions into that field.
It should look something like this:
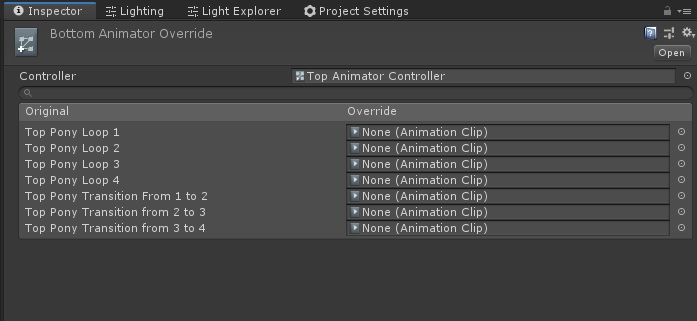
Now we just drag and drop our animation clips for the other character into the corresponding fields here.
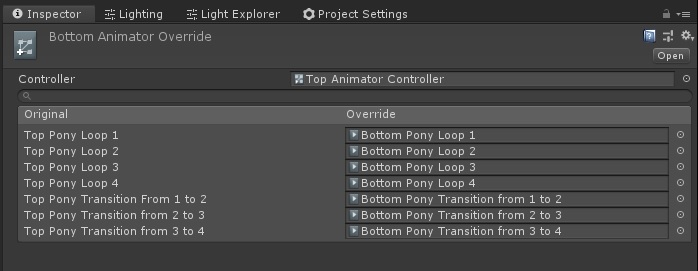
We can click on the bottom character, now, and drag and drop our override controller into her animator controller spot.
Just like with the top character, we can test this character’s animations in play mode. It uses the same logic as the first one we created so there shouldn’t be any surprises.
Want to test them together to make sure you’re synchronized OK before making a build? Use the Besti SDK Animation Tester. This is a simple tool that lets you send a state to multiple characters without needing to build your scene to test it.
Understand that you will make mistakes doing this. I (Skunkfrakker) have been doing this for 5 years, and I still make logical mistakes setting up state machines. While not particularly difficult, there are many places where mistakes can be made. Don’t be hard on yourself if you aren’t getting the results you want; just keep at it.
Assuming you got your animation to work OK, let’s move on to the next step, which is setting up a user interface for the underlying logic you just made.
Quick Navigation
Part 3: Setting up the Besti SDK
Part 4: Exporting your cartoon for Besti
Part 5: Importing your cartoon in Besti
Part 9: Your State Machine (You are here)
Part 13: Distributing your content
