
Latest Version: 0
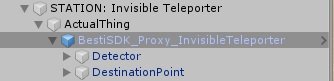
The Invisible Teleporter is a scene design tool that moves players from a sensor area where it detects the player, to a destination area. It is a “Proxy” object, meaning that it is a stand-alone tool that is different in the SDK than it is in the software itself. While it is represented with semi-transparent boxes and arrows in the Besti SDK, inside of Besti it is completely invisible. If you would like your teleporter to have a graphical effect, you can add a 3D model or particle effect to the root teleporter object (the object that is at the highest level in the hierarchy for the teleporter.)
Video Overview
How to use
- Drag and Drop the BestiSDK_Proxy_InvisibleTeleporter object into your scene.
- Adjust the size and position of the sensor and destination as desired.
- Configure any additional options that you may want on this object.
The Proxy Invisible Teleporter looks like this:
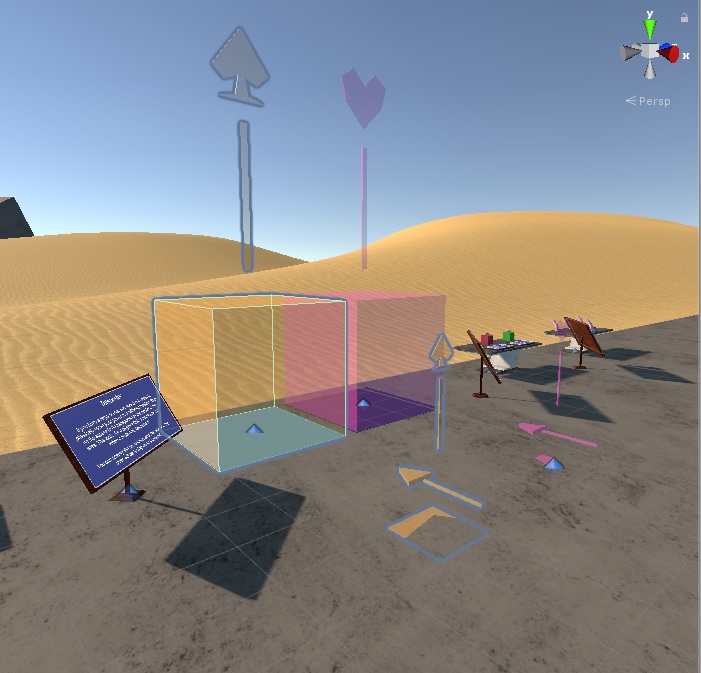
- The large box is the sensor area. This is what detects the player.
- The small box and arrow is the destination point that the player will be moved to when he or she is detected in the sensor area.
When the object is first placed in the scene you will see the sensor area, and the destination point next to one another. Inside the object are 2 things that you can adjust: the Detector, and the Destination point.
To move these objects, click on the item you want to move in the hierarchy window to select it, and then drag it to the desired position. If you want a larger or smaller sensor area, click the “Detector” object, and then adjust the scale in the Inspector window.
The DestinationPoint object is where the player will be teleported to when detected by the sensor. The direction the arrow faces is the direction that the user will be facing after the teleport. You can rotate this as desired to have your user come out of the teleport facing in a desired direction.
Section Information
Objects and Options

The options section contains 4 main parts
- The Hide Graphics in Editor option.
- The Detect Hands option
- The Suit to Set dropdown
- The Internal Variables section
The Hide Graphics in Editor Option enables or disables the visualization. The teleporter is invisible by default, and by pressing this, the teleporter will be made invisible. You may with to do this if you are creating your own graphical effect for the teleporter, because the editor graphics may be annoying or get in the way of you seeing what your effect will look like.
The Detect Hands option allows you to change how the sensor works. By default, the sensor only looks for the user’s head inside the sensor. If you enable detect hands, it will also look for the user’s hands in the sensor area. For instance, by default, you can reach your hands inside the sensor area, and nothing will happen. If you turn this option on, even reaching a hand within the sensor will teleport the player to the destination point.
The Suit to Set Dropdown allows you to change the visualization in the editor of the teleporter. This is a completely optional feature, but it allows you to more easily identify which destination point is associated with which sensor. If you have multiple teleporters, this might be very difficult to do if they all looked the same. By changing the suit, you can quickly identify that the “Spade” sensor will teleport users to the “Spade” destination. There is not a limit of 4 teleporters, so you can have multiple spades, hearts, or other suits. This is just a way to easily differentiate different teleport systems that you may have within your scene.
The Internal Variables section can be safely ignored. It contains the required references used by the code that generates the visualization in the editor, and nothing requires adjustment. If you change the references in here, there is no guarantee that your teleporter will function properly.